Set static IP-Address and network information (SOUL 2.x on CoreOS)
- Connect to the server via ssh or command line
User: platform
Password: Current maintenance password - Identify the active network
Run following command and check the output of the first 8 entries:
ip addrThe active network interface is marked with “
state UP“.
In our example below entry no.2 reflects the active network interface. - Get the MAC-address (link/ether) from this entry. In our example “0c:c4:7a:c4:ab:bc” would be the correct one.
- Next create a configuration file containing the desired network information and open it in VIM editor:
sudo vim /etc/systemd/network/static.network
Pressing the key “i” enables you to edit the file. Now add the following content – but of course with your specific network information:[Match] MACAddress=0c:c4:7a:c4:ab:bc[Network]
Address=192.168.0.15/24
Gateway=192.168.0.1 - After filling sections “MACAddress”, “Name”, “Adress” and “Gateway” with your specific values, save the file:
- Press key “esc”
- Type “
:x” and press “Enter”
- Activate the new configuration with following command:
sudo systemctl restart systemd-networkd
Example output ip add
platform@testserver ~ $ ip addr
1: lo: <LOOPBACK,UP,LOWER_UP> mtu 65536 qdisc noqueue state UNKNOWN group default qlen 1
link/loopback 00:00:00:00:00:00 brd 00:00:00:00:00:00
inet 127.0.0.1/8 scope host lo
valid_lft forever preferred_lft forever
inet6 ::1/128 scope host
valid_lft forever preferred_lft forever
2: eno1: <BROADCAST,MULTICAST,UP,LOWER_UP> mtu 1500 qdisc mq state UP group default qlen 1000
link/ether 0c:c4:7a:c4:ab:bc brd ff:ff:ff:ff:ff:ff
inet 172.16.12.209/16 brd 172.16.255.255 scope global dynamic eno1
valid_lft 81215sec preferred_lft 81215sec
inet6 fe80::ec4:7aff:fec4:abbc/64 scope link
valid_lft forever preferred_lft forever
3: eth1: <NO-CARRIER,BROADCAST,MULTICAST,UP> mtu 1500 qdisc mq state DOWN group default qlen 1000
link/ether 0c:c4:7a:c4:ab:bd brd ff:ff:ff:ff:ff:ff
4: wl_private: <BROADCAST,MULTICAST,UP,LOWER_UP> mtu 1500 qdisc mq state UP group default qlen 1000
link/ether 00:0e:8e:6d:78:0b brd ff:ff:ff:ff:ff:ff
inet 10.42.0.1/16 brd 10.42.255.255 scope global wl_private
valid_lft forever preferred_lft forever
inet6 fe80::20e:8eff:fe6d:780b/64 scope link
valid_lft forever preferred_lft forever
5: eth2: <NO-CARRIER,BROADCAST,MULTICAST,UP> mtu 1500 qdisc mq state DOWN group default qlen 1000
link/ether 0c:c4:7a:c4:ae:28 brd ff:ff:ff:ff:ff:ff
6: eno2: <NO-CARRIER,BROADCAST,MULTICAST,UP> mtu 1500 qdisc mq state DOWN group default qlen 1000
link/ether 0c:c4:7a:c4:ae:29 brd ff:ff:ff:ff:ff:ff
7: br-257682b47eea: <BROADCAST,MULTICAST,UP,LOWER_UP> mtu 1500 qdisc noqueue state UP group default
link/ether 02:42:bc:d5:c8:34 brd ff:ff:ff:ff:ff:ff
inet 172.18.0.1/16 scope global br-257682b47eea
valid_lft forever preferred_lft forever
inet6 fe80::42:bcff:fed5:c834/64 scope link
valid_lft forever preferred_lft forever
8: docker0: <BROADCAST,MULTICAST,UP,LOWER_UP> mtu 1500 qdisc noqueue state UP group default
link/ether 02:42:38:6a:28:6b brd ff:ff:ff:ff:ff:ff
inet 172.17.0.1/16 scope global docker0
valid_lft forever preferred_lft forever
inet6 fe80::42:38ff:fe6a:286b/64 scope link
valid_lft forever preferred_lft forever
Information for creating custom backup scripts (SOUL on CoreOS)
Please note: The following information are related to SOUL 2.x running on CoreOS
Implementing a custom backup script requires linux skills. Following information are intended to be used by experienced administrators and service providers.
# Setting up custom backup
## What needs to be backed up?
All user data and box configuration is stored in these two file system paths:
* `/data`

* `/etc/protonet`
## How can I run a periodical backup?
*See also the CoreOS documentation: https://coreos.com/os/docs/latest/scheduling-tasks-with-systemd-timers.html*
Create a task that performs your desired backup – obviously also make sure that authentication is set up correctly,
for example that the user root has an SSH public key deployed to the target host in this example.
# File: /etc/systemd/system/custom-backup.service

[Unit]
Description=Makes a backup to a remote host
[Service]
Type=oneshot

ExecStart=/path/to/backup-program --with-proper-arguments-for-sync
Create a systemd timer. See also the Arch Linux Wiki: https://wiki.archlinux.org/index.php/Systemd/Timers for details
on the various available timers.
# File: /etc/systemd/system/custom-backup.timer

[Unit]
Description=Run custom-backup.service once a week
[Timer]
OnCalendar=weekly

Persistent=true
Creating your own backup is handled as a custom specific change which is not reflected within default support range. If you need help implementing or maintaining such a change, we can get you in touch with our technical partners.
SSH access over the internet
The easiest way to establish an SSH connection to the Protonet server with a unix-compatible OS (MacOS, Linux) over the internet is to use an alias:
alias nodessh=’ssh -o “ProxyCommand nc -X connect -x ssh.protonet.info:8022 %h %p” -o “User protonet” -o ServerAliveInterval=15 -o ServerAliveCountMax=3′
It can be persisted in the .bashrc-Datei in the users home directory. Connections can be created as follows:
nodessh SERVERNAME
SERVERNAME means here the Protonet address without “.protonet.info” – SERVERNAME.protonet.info
Within Windows it is easiest to use the tool Putty.
Enter the servers web address without the tailing .protonet.info like this
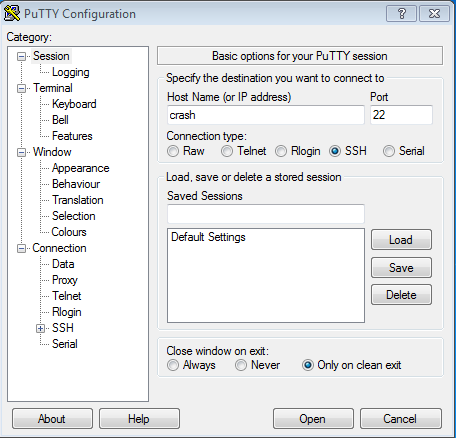
Set the user name to protonet:
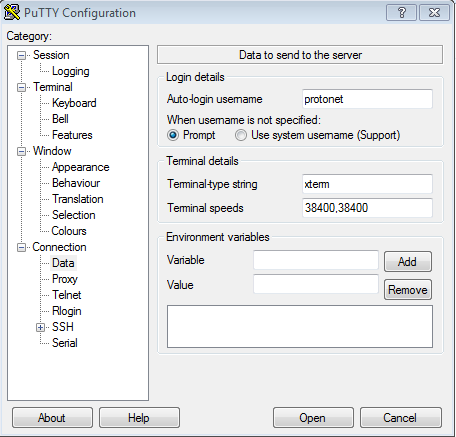
Finally, enter the HTTP Proxy ssh.protonet.info and the following command, as can be seen on the image below:
plink -nc -X connect -x proxyhost %host %port
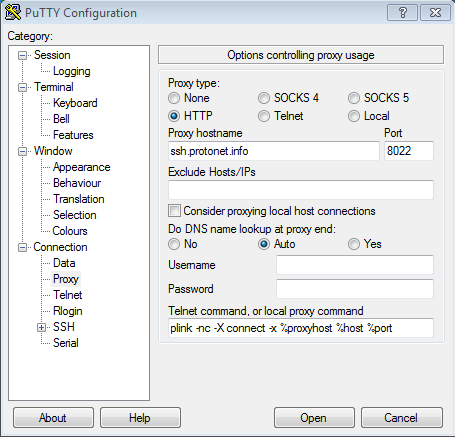
Pressing “Open” creates a console window that will ask for your servers maintenance password.
How to set static network settings on Protonet servers
By default Protonet Servers are expecting getting network information from a DHCP server.
If necessary, static network address information can be set using the command line utility netconf:

- During the setup routine, if network information are missing, the credentials necessary to access the Linux console are shown on the setup screen.
- You can access Protonet servers console by connecting screen and keyboard or via SSH. If a server is already setup, the current maintenance password is needed.
The user is “protonet”.
netconf
netconf provides two modes: The assistant and the command line mode.
The assistant is more or less self-explaining:
If you get the screen in German, please type 4 and press <Enter>. Then move on choosing the desired option by typing the according number and press <Enter> again.
netconf command line mode
netconf --help provides an overview of the flags available:
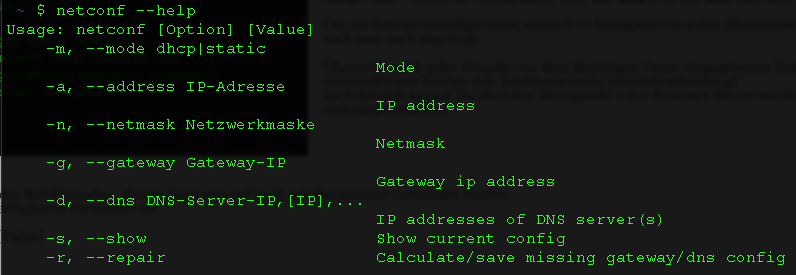
Examples:
- Show current settings:
netconf -s - Switch to dhcp mode:
netconf -m dhcp - Set static settings with two DNS servers (separated by komma):
netconf -m static -a 192.168.0.200 -n 255.255.255.0 -g 192.168.0.1 -d 192.168.0.1,192.168.0.2
Please double check any settings you made and keep the maintenance password in a safe place, in case you find network issues after the server reboot.
In case you did a mistake, simply move back to dhcp to revert to the default dhcp mode.
netconf should always be executed with the latest SOUL release. Before stable/59, the tool didn’t work properly on Carlas/Carlitas.
Can I install additional software or services on the Protonet server?
To ensure the stability of the Protonet software and protecty your data, we have decided to run SOUL on an persistent operating system. However, in individual cases there may still be technical reasons to set up additional configuration or services on the Protonet Server.
In general we advice to install additional software and services on the Protonet server within virtual machines.
Small customizations can be realized with so called local_patches.
Modifications of the Protonet server always happen at your own risk and not covered by standard support!
In case of any issues after modifications have been applied by adding custom configuration or shell scripts, any changes need to be removed to test whether they cause or trigger the problem. To do so it might be necessary to connect a HDMI display and a USB keyboard to the Protonet server.
List of port numbers in use
This list of ports is irrelevant for most of our customers.
When shipped, the Protonet boxes are configured to just work with all the usual internet connections and receive all necessary network information automatically via DHCP.
Outgoing connections:
ssh (TCP 22666) for the protonet.info-address,
https (TCP 443) for mail dispatch,
http (TCP 80) for updates,
ntp (UDP 123) for time syncronisation,
webrtc (TCP/UDP 3478) for video calls,
dns (UDP 53) for name resolution,
smtp (TCP 25) for custom mail addresses and future mail dispatch.
Incoming when using your own domain:
https (TCP 443) for access to Soul.
Command line/SSH access to the Protonet server
It is possible to access the command line directly via ssh or by connecting a display and keyboard directly to the Protonet server.
The user name is protonet and the password is the current maintenance password.
MacOS or Linux – using ssh in a terminal
- With the internal IP of your server (find it on the Help page in SOUL or your routers device table) and the user protonet you can login to your server:
ssh protonet@[your servers IP]Note: Accessing your server over SSH via your Protonet internet address (boxname.protonet.info) from outside your network is documented in this article. - Enter your maintenance password into the password prompt and confirm by pressing enter. The password is not displayed while you enter it!
Windows – using an SSH client like Putty
- Start the client and enter the IP address of your Protonet server in the corresponding field
- Press Open.
- Confirm the prompt wether to trust the server with ‘yes’.
=>A new windows opens displaying ‘Login as:‘. - Enter the user name
protonetand confirm with enter. - In the password prompt, enter your maintenance password and confirm with enter. The password is not displayed while you ebter it!
Note: You can not paste with CTRL+V in Putty but it works with a right click.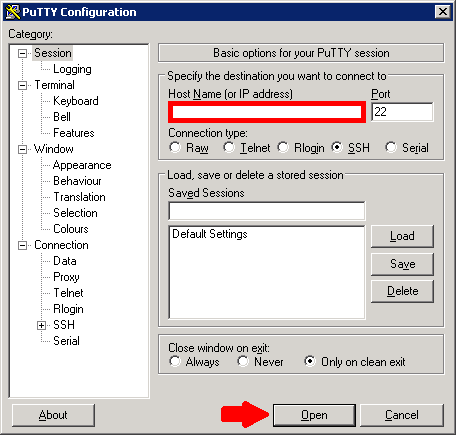
How to create virtual machines on Carla?
For implementing a VM with the KVM / qemu technology the following steps are necessary:
1.) Create a disk image containing the VM:
cd /protonet/data/var/lib/libvirt/
sudo mkdir images
cd images/
qemu-img create -f qcow2 disk-image-vm.qcow2 2T
qcow2 = format of the image that allows for snapshots to be saved
2T = size of the disk image, in this case 2 terabytes
2.) Upload the installation media, i.e. CentOS as an ISO image:
scp CentOS-7.0-1406-x86_64-DVD.iso protonet@<HOSTNAME>:/protonet/data/var/lib/libvirt/images/
=> Enter your maintenance password
3.) Installation of the operating system within the VM:
virt-install –connect=qemu:///system –name=linux-server –ram=4096 –vcpus=4 –disk path=/protonet/data/var/lib/libvirt/images/disk-image-vm.qcow2 –vnc –os-type=linux –network=bridge:br0 –disk /protonet/data/var/lib/libvirt/images/CentOS-7.0-1406-x86_64-DVD.iso,device=cdrom
–ram = memory (RAM) size in megabytes
–vcpus = number of processor cores
–network = set up as a bridge interface so the the VM is in the same network as the Protonet server
4.) Access to the VM:
ssh protonet@<HOSTNAME> -L 5900:localhost:5900
Use a VNC viewer to connect to localhost:0
5.) KVM management:
the KVM shell “virsh” provides all options via command line, i.e.:
virsh list –all => displays all VMs (running and stopped)
virsh start <VM name>
virsh shutdown <VM name>
virsh destroy <VM name>, if shutdown fails
Source: http://blog.onlinehelp24.net/post/97054196815/vm-auf-protonet-einrichten
Additional information from our support:
- When planning virtual machines, please remember that Protonet SOUL requires a minimum of 8 GB memory (RAM).
- If the following error occurs while installing a VM:
"Installation konnte nicht fertiggestellt werden: [...] could not open disk image /var/lib/libvirt/images/disk-image-vm-qcow2: Permission denied"
permissions must be corrected for the folder/var/lib/libvirt/images/like this:
chown -R libvirt-qemu:kvm /var/lib/libvirt/images/
Please note: Make sure SOUL still has a minimum of 8GB of RAM available.
Support might be limited if you modify the hardware or software and this leads to problems. Any modifications are at your own risk!