In these instructions we run through the entire scenario with SOUL Stable/xxx as example and use services from specific manufacturers and providers. Individual steps can therefore vary!
For SOUL owners of version soul3/xxx there are slight deviations, e.g. no configuration on command line level is necessary.
Brief instructions can be found here:
1. Register with a web hosting service provider and register your web address.
In these instructions we use the DynDNS provider https://secure.selfhost.de as an example and have created the address protonetsupport.selfhost.eu there.
2. Configure the router with the (Dyn) DNS address:
The router is set up in such a way that it regularly reports its current IP address to the (Dyn) DNS service. As a rule, both the DynDNS provider and the router manufacturer provide instructions for this. For example, in the FRITZ! Box 7490 you can find this setting under Internet -> Approvals -> Dynamic DNS.
Attention: With selfHOST.de, the access data sent first are not entered in the router, but the ones listed under “DynDNS Accounts” (access data update client).
3. Set up port sharing
The router should forward all requests it receives on ports 443 and 80 to the Protonet server on ports 443 and 80.
4. Change the links in Protonet SOUL to the new server address
a) For servers with the version SOUL soul3 / xxxx:
Please continue on to step 6.
b) For servers with the SOUL stable / xxx version:
Log in to the Protonet server with user “protonet” and maintenance password via ssh and execute the following command:
custom_nodename DynDNS-Adresse
Btw: Please save the Maintenance Password somewhere outside the Box.
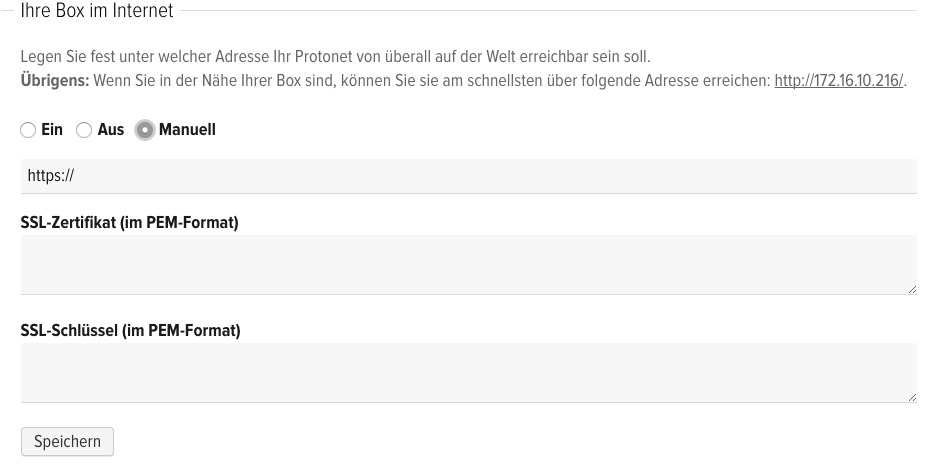
5. Deactivate the Internet address servername.protonet.info in the system settings
Without switching off, the adjustments in SOUL will not be active!
Now you can access your Protonet server via https://protonetsupport.selfhost.eu!
After setting up the DynDNS address on the router and Protonet server as described in the first part, Protonet SOUL can be accessed via a browser and an encrypted connection via https://protonetsupport.selfhost.eu, but a security warning is displayed beforehand. This means that although the connection is 128-bit encrypted, the identity of the server cannot be confirmed.
6. If you want to avoid this warning message, you need your own SSL server certificate which must be stored on the Protonet server. From here it gets a bit trickier … The following steps will help you or your IT expert!
The use of the Protonet apps also requires a valid SSL server certificate!
7. Forward your own (sub) domain to the DynDNS address
There does not seem to be a provider at the moment where it is possible to obtain a certificate for a DynDNS address. Domain ownership is a prerequisite here and is also verified against the email address of the responsible postmaster during the first certificate creation.
Therefore you first need a domain (or ask someone who has one), where you then create a subdomain (e.g. protonet) under “Change DNS”, for example with the website provider Prosite or Alfahosting, select the type CNAME and your destination Specify DynDNS address.
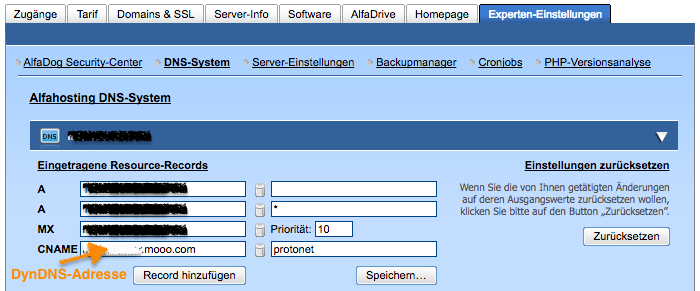
CNAME- Beispiel vom Provider “Alfahosting”. Subdomain= “protonet”. DynDNS Anbieter: “FreeDNS”
Shortly afterwards your Protonet server should already be accessible via https://protonet.dyourdomain.de!
Since you will now use a new address, carry out step 4. “Change the links in Protonet SOUL to the new server address” again to store the new address protonet.dyourdomain.de on the server.
On servers with at least the SOUL soul3 / 1508 version, the SSL certificate is entered directly in the system settings
There are helpful instructions in points 8 and 9.
Further steps are not necessary for servers with version soul3/1508 and newer!
Servers with at least SOUL version stable 90/91) can easily bypass the complex subsequent steps with their own certificate through our Let’s Encrypt integration
This is how it works on the command line / via SSH:
Enter letsencrypt, confirm with Enter
The script “letsencrypt”
FERTIG, die Punkte 8 – 12 können nach Ausführung von “letsencrypt” ignoriert werden.
The following steps are intended to help administrators who want to store their own certificate.
Support in the following steps is provided by Protonet partners. Protonet will be happy to put you in touch here.
8. Create SSL server certificate, e.g. at StartSSL in the “control area”
What is still missing is the SSL server certificate. You can obtain this from your website provider or other services, such as in our example StartSSL https://www.startssl.com.
After successful registration, the “Certificates Wizard” can be executed via the control area, which provides the necessary certificates / keys when the wizard is followed.
For other providers of SSL certificates, where you have to upload a CSR (Certificate Signing Request), there are instructions here on how the CSR can be created on a Linux system.
Most SSL certificate providers also offer instructions on how to create a certificate on their website.
9. Edit the certificate
The files ssl.crt and ssl.key saved during the generation process now have to be edited.
a) Decrypting the private key, naming it httpd_ssl.key
Use the StartSSL Toolbox or the openssl command in the Linux or MacOS console to create a new file “` httpd_ssl.key` “:
openssl rsa -in ssl.key -out httpd_ssl.key
b) Download the files ca.pem and sub.class1.server.ca.pem
http://www.startssl.com/certs/ca.pem
http://www.startssl.com/certs/sub.class1.server.ca.pem
Ideally, you save these in the same folder as the key and crt files.
c) Combination of the files ssl.crt, sub.class1.server.ca.pem, ca.pem into the new file `httpd_ssl.crt`
In Linux or MacOS, this is simply done via the console:
cat ssl.crt sub.class1.server.ca.pem ca.pem > httpd_ssl.crt
It is important that your own certificate is first in the httpd_ssl.crt file!
Under Windows you would create a new file httpd_ssl.crt and copy the contents of the individual files to it one after the other.
Important: check the file content!
INCORRECT:
If you see a long line, break it after 5 – (hyphens / minus signs) to correct it.
-----END CERTIFICATE----------BEGIN CERTIFICATE-----
RIGHT:
The individual segments are separated from one another by line breaks:
This is how an httpd_ssl.crt would look like, with a total of 4 certificates:
-----BEGIN CERTIFICATE-----

Body of the leaf certificate

-----END CERTIFICATE-----
—–BEGIN CERTIFICATE—–
Body of the first intermediate certificate
—–END CERTIFICATE—–
—–BEGIN CERTIFICATE—–
Body of the second intermediate certificate
—–END CERTIFICATE—–
—–BEGIN CERTIFICATE—–
Body of the root certificate
—–END CERTIFICATE—–
There must be 5 “-” before and after END or BEGIN CERTIFICATE!
10. Upload certificates to the Protonet server
The resulting files httpd_ssl.key and httpd_ssl.crt must be stored on the Protonet server under /etc/protonet
Attention: If you have not written down the maintenance password and put it aside at this point in time, you should do so now!
Providing incorrect certificates can mean that Protonet SOUL can no longer be loaded. In this case you need console access to solve the problem!
11. Restart the server
The Protonet server should be accessible after about 5 minutes via https://protonet.dyourdomain.de and without a security warning in the browser.
12. After restarting and waiting 5 minutes, SOUL cannot be reached?
a) Log in via SSH
b) Check log for error messages:
tail -f /home/protonet/dashboard/shared/log/services/nginx/current
c) If necessary, try deleting the certificates and reboot (new certificates will be generated automatically)
d) Other helpful instructions: