How to connect and setup Protonet servers?
Protonet Serves are being delivered with a user instruction brochures covering the setup and initial steps:
The brochures contain the following instructions:
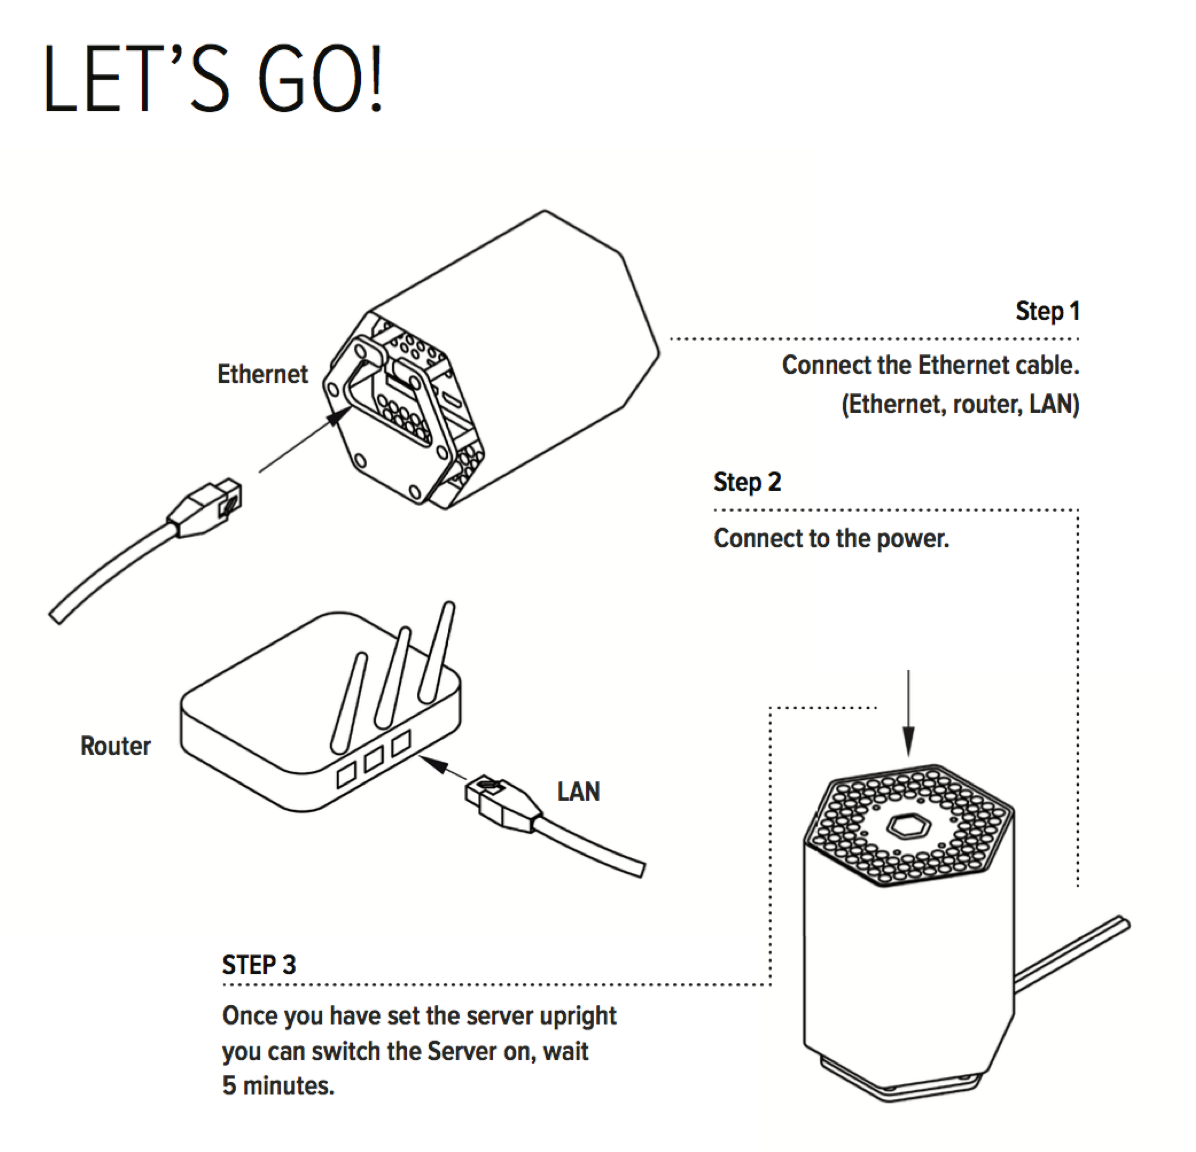
Maya
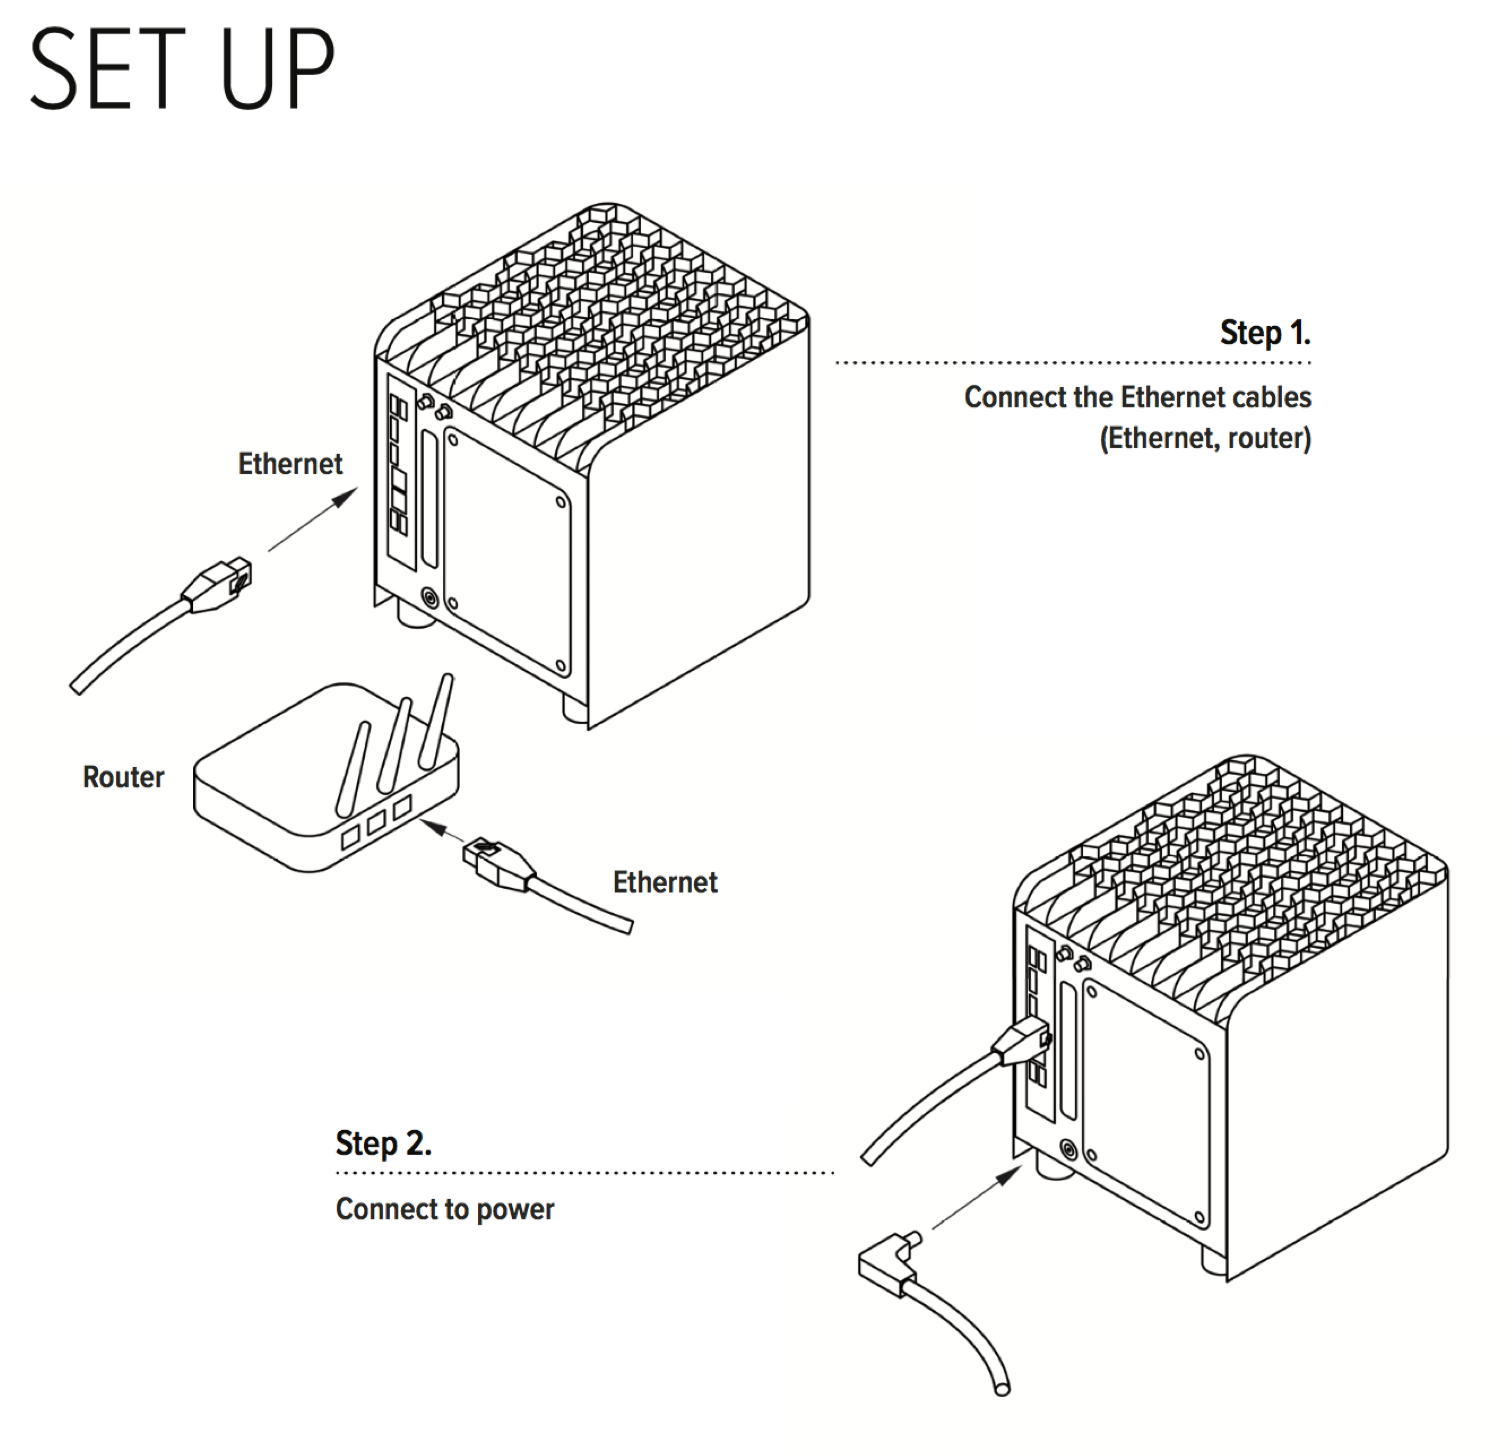
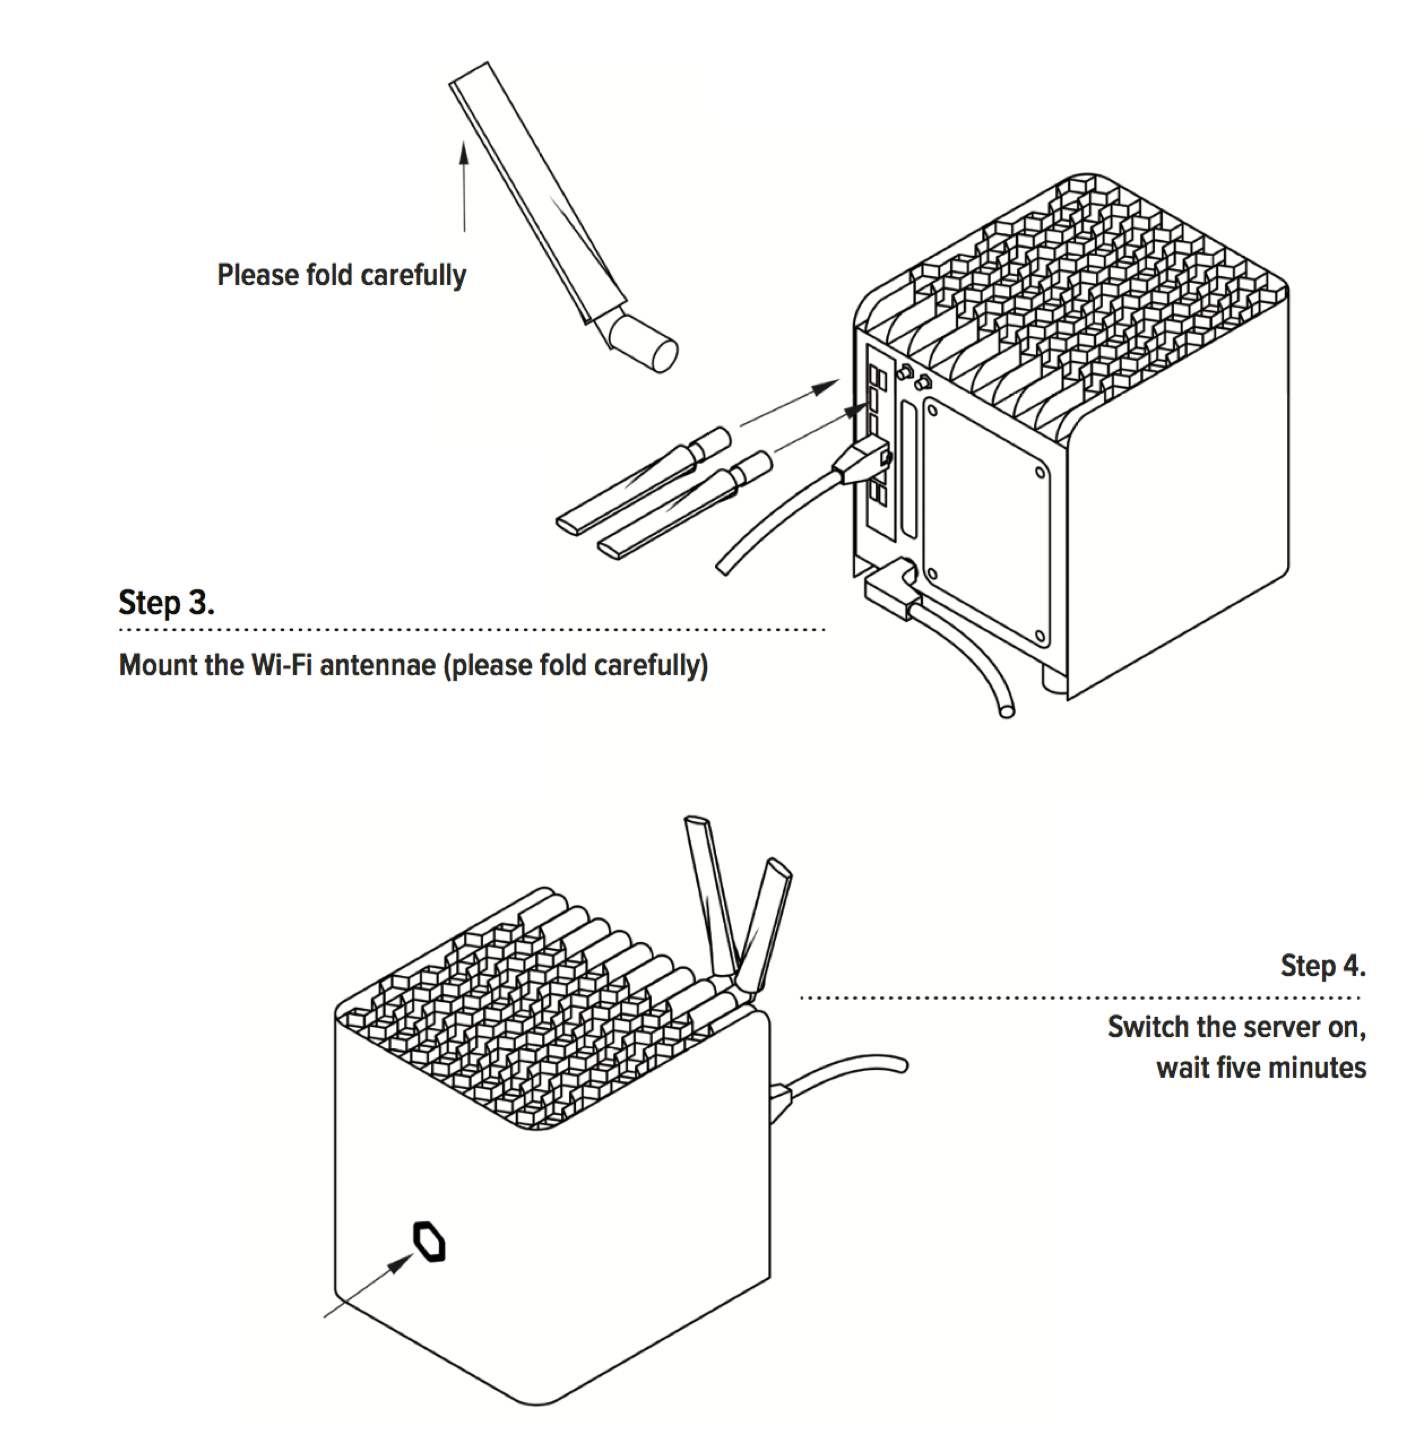
Carla/Carlita
Requirements & recommendations
Internet connection bandwith
Upstream
- Minimum: 2 MBit/s of upstream – for low data volume
- Recommended: 5 MBit/s of upstream or higher (SDSL/VDSL)
Downstream
- Minimum: 6 MBit/s of downstream – for low data volume
- Recommended: 16 MBit/s of downstream or higher
Internet router
- Required: 1 free ethernet port
- Recommended: Automatic IP address management via DHCP server (How to set static network information on the server)
LAN
- Minimum: 100-Mbit/s connection
- Recommended: Gigabit connection
WiFi
- Minimum: WiFi adapter supporting the n-specification (802.11n)
Background
We have chosen to include specific and powerful hardware and software components as well as technologies in our Protonet servers. For example, the built-in wifi access point has a transfer speed from 150 Mbit/s to 300 Mbit/s in the 2,4-GHz spectrum. The ethernet port is designed for a gigabit connection.
But these high connection speeds can only be reached if the components used in the local area network also support these standards. Otherwise, slower components will limit the performance of your Protonet server.
For example: A slow internet connection will negatively impact the transfer speed of data already or to be stored on the Protonet server.
Does the setup process require internet access?
Yes.
During initial setup the box needs to connect to a Protonet server in order to register a protonet.info-address and receive a valid license*. If the box is unable to connect to the internet for initial setup, the setup assistant can’t be finished.
*The update mechanism and email notifications will only work if the box was successfully registered during setup and received a valid Protonet license.
How to set static network settings on Protonet servers
By default Protonet Servers are expecting getting network information from a DHCP server.
If necessary, static network address information can be set using the command line utility netconf:

- During the setup routine, if network information are missing, the credentials necessary to access the Linux console are shown on the setup screen.
- You can access Protonet servers console by connecting screen and keyboard or via SSH. If a server is already setup, the current maintenance password is needed.
The user is “protonet”.
netconf
netconf provides two modes: The assistant and the command line mode.
The assistant is more or less self-explaining:
If you get the screen in German, please type 4 and press <Enter>. Then move on choosing the desired option by typing the according number and press <Enter> again.
netconf command line mode
netconf --help provides an overview of the flags available:
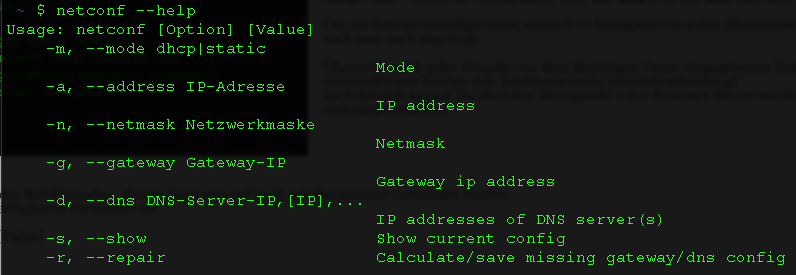
Examples:
- Show current settings:
netconf -s - Switch to dhcp mode:
netconf -m dhcp - Set static settings with two DNS servers (separated by komma):
netconf -m static -a 192.168.0.200 -n 255.255.255.0 -g 192.168.0.1 -d 192.168.0.1,192.168.0.2
Please double check any settings you made and keep the maintenance password in a safe place, in case you find network issues after the server reboot.
In case you did a mistake, simply move back to dhcp to revert to the default dhcp mode.
netconf should always be executed with the latest SOUL release. Before stable/59, the tool didn’t work properly on Carlas/Carlitas.
We have a firewall – anything I need to know?
Out-of-the-box Protonet servers are configured in a way, that they can simply be plugged into the internet router and get all information needed (via dhcp).
If a Protonet box can not be accessed by its *.protonet.info-address or if the initial configuration fails, your company’s firewall may need to be configured to allow access to our proxy infrastructure:
Protonet servers by default must be able to reach the IP-addresses
- New: 176.9.208.209
- New: 176.9.208.211
- 13.94.194.96
- 46.253.116.250
- 46.253.116.251
- 138.201.71.59
on target ports 22666 and 443. Alternatively, the Protonet network 46.253.116.0/24 can be added.
Additionally the ports 80 and 443 need to be reachable for software updates on this address:
- New: 94.130.54.181
- 13.73.161.233
- 138.201.198.118
On very restrictive firewalls you might also need to open the following ports for outgoing connections:
- https (TCP 443) – required for sending mails, protonet.info address and receiving updates
- http (TCP 80)- required for antivirus updates
- ntp (UDP 123) – required for clock sync
- webrtc (TCP/UDP 3478) – required for video calls
- dns (UDP 53) – required for name resolution
- smtp (TCP 25) – required with own smtp server configured
For the sake of simplicity, we recommend allowing all outgoing connections of the Protonet server via ports 22666, 443 and 80.
How are Protonet servers by default accessible via the internet?
By default our servers are accessible via a proxy service. As soon as an internet connection is available the server connects to the proxy service, unless you disabled this in the ‘Your Box on the Internet’ section. The proxy service makes the box accessible via the chosen servername.protonet.info address.
Any traffic between your server and the proxy service is encrypted with a Protonet certificate.
It is also possible to use your own domain or a DynDNS domain (German instructions can be found here). Please ask Support in case you need assistance.
Regarding why we do it this way, there is a German blog post available here.
Command line/SSH access to the Protonet server
It is possible to access the command line directly via ssh or by connecting a display and keyboard directly to the Protonet server.
The user name is protonet and the password is the current maintenance password.
MacOS or Linux – using ssh in a terminal
- With the internal IP of your server (find it on the Help page in SOUL or your routers device table) and the user protonet you can login to your server:
ssh protonet@[your servers IP]Note: Accessing your server over SSH via your Protonet internet address (boxname.protonet.info) from outside your network is documented in this article. - Enter your maintenance password into the password prompt and confirm by pressing enter. The password is not displayed while you enter it!
Windows – using an SSH client like Putty
- Start the client and enter the IP address of your Protonet server in the corresponding field
- Press Open.
- Confirm the prompt wether to trust the server with ‘yes’.
=>A new windows opens displaying ‘Login as:‘. - Enter the user name
protonetand confirm with enter. - In the password prompt, enter your maintenance password and confirm with enter. The password is not displayed while you ebter it!
Note: You can not paste with CTRL+V in Putty but it works with a right click.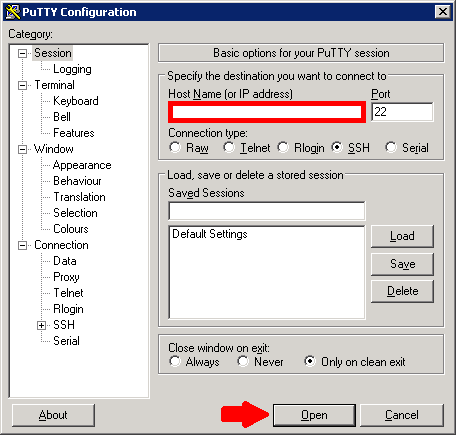
Can a Protonet server be connected to our network via wifi?
This is not possible. The Protonet servers wifi module is intended to provide wifi access, for instance as an alternative to a router or access point.
A free network port at a switch or a router is necessary to connect the Protonet server to a network.