News
Privacy Policy
Privacy Policy
Last updated: June 10, 2022
This Privacy Policy describes Our policies and procedures on the collection, use and disclosure of Your information when You use the Service and tells You about Your privacy rights and how the law protects You.
We use Your Personal data to provide and improve the Service. By using the Service, You agree to the collection and use of information in accordance with this Privacy Policy
Interpretation and Definitions
Interpretation
The words of which the initial letter is capitalized have meanings defined under the following conditions. The following definitions shall have the same meaning regardless of whether they appear in singular or in plural.
Definitions
For the purposes of this Privacy Policy:
- Account means a unique account created for You to access our Service or parts of our Service.
- Affiliate means an entity that controls, is controlled by or is under common control with a party, where “control” means ownership of 50% or more of the shares, equity interest or other securities entitled to vote for election of directors or other managing authority.
- Application means the software program provided by the Company downloaded by You on any electronic device, named Protonet Soul
- Company (referred to as either “the Company”, “We”, “Us” or “Our” in this Agreement) refers to Protonet ,Inc., One Avenue of the Palms, Suite 131 San Francisco, CA 94130 USA.
- Country refers to: California, United States
- Device means any device that can access the Service such as a computer, a cellphone or a digital tablet.
- Personal Data is any information that relates to an identified or identifiable individual.
- Service refers to the Application.
- Service Provider means any natural or legal person who processes the data on behalf of the Company. It refers to third-party companies or individuals employed by the Company to facilitate the Service, to provide the Service on behalf of the Company, to perform services related to the Service or to assist the Company in analyzing how the Service is used.
- Usage Data refers to data collected automatically, either generated by the use of the Service or from the Service infrastructure itself (for example, the duration of a page visit).
- You means the individual accessing or using the Service, or the company, or other legal entity on behalf of which such individual is accessing or using the Service, as applicable.
Collecting and Using Your Personal Data
Types of Data Collected
Personal Data
While using Our Service, We may ask You to provide Us with certain personally identifiable information that can be used to contact or identify You. Personally identifiable information may include, but is not limited to:
- Email address
- First name and last name
- Usage Data
Usage Data
Usage Data is collected automatically when using the Service.
Usage Data may include information such as Your Device’s Internet Protocol address (e.g. IP address), browser type, browser version, the pages of our Service that You visit, the time and date of Your visit, the time spent on those pages, unique device identifiers and other diagnostic data.
When You access the Service by or through a mobile device, We may collect certain information automatically, including, but not limited to, the type of mobile device You use, Your mobile device unique ID, the IP address of Your mobile device, Your mobile operating system, the type of mobile Internet browser You use, unique device identifiers and other diagnostic data.
We may also collect information that Your browser sends whenever You visit our Service or when You access the Service by or through a mobile device.
Information Collected while Using the Application
While using Our Application, in order to provide features of Our Application, We may collect, with Your prior permission:
- Information regarding your location
- Pictures and other information from your Device’s camera and photo library
We use this information to provide features of Our Service, to improve and customize Our Service. The information may be uploaded to the Company’s servers and/or a Service Provider’s server or it may be simply stored on Your device.
You can enable or disable access to this information at any time, through Your Device settings.
Use of Your Personal Data
The Company may use Personal Data for the following purposes:
- To provide and maintain our Service, including to monitor the usage of our Service.
- To manage Your Account: to manage Your registration as a user of the Service. The Personal Data You provide can give You access to different functionalities of the Service that are available to You as a registered user.
- For the performance of a contract: the development, compliance and undertaking of the purchase contract for the products, items or services You have purchased or of any other contract with Us through the Service.
- To contact You: To contact You by email, telephone calls, SMS, or other equivalent forms of electronic communication, such as a mobile application’s push notifications regarding updates or informative communications related to the functionalities, products or contracted services, including the security updates, when necessary or reasonable for their implementation.
- To provide You with news, special offers and general information about other goods, services and events which we offer that are similar to those that you have already purchased or enquired about unless You have opted not to receive such information.
- To manage Your requests: To attend and manage Your requests to Us.
- For business transfers: We may use Your information to evaluate or conduct a merger, divestiture, restructuring, reorganization, dissolution, or other sale or transfer of some or all of Our assets, whether as a going concern or as part of bankruptcy, liquidation, or similar proceeding, in which Personal Data held by Us about our Service users is among the assets transferred.
- For other purposes: We may use Your information for other purposes, such as data analysis, identifying usage trends, determining the effectiveness of our promotional campaigns and to evaluate and improve our Service, products, services, marketing and your experience.
We may share Your personal information in the following situations:
- With Service Providers: We may share Your personal information with Service Providers to monitor and analyze the use of our Service, to contact You.
- For business transfers: We may share or transfer Your personal information in connection with, or during negotiations of, any merger, sale of Company assets, financing, or acquisition of all or a portion of Our business to another company.
- With Affiliates: We may share Your information with Our affiliates, in which case we will require those affiliates to honor this Privacy Policy. Affiliates include Our parent company and any other subsidiaries, joint venture partners or other companies that We control or that are under common control with Us.
- With business partners: We may share Your information with Our business partners to offer You certain products, services or promotions.
- With other users: when You share personal information or otherwise interact in the public areas with other users, such information may be viewed by all users and may be publicly distributed outside.
- With Your consent: We may disclose Your personal information for any other purpose with Your consent.
Retention of Your Personal Data
The Company will retain Your Personal Data only for as long as is necessary for the purposes set out in this Privacy Policy. We will retain and use Your Personal Data to the extent necessary to comply with our legal obligations (for example, if we are required to retain your data to comply with applicable laws), resolve disputes, and enforce our legal agreements and policies.
The Company will also retain Usage Data for internal analysis purposes. Usage Data is generally retained for a shorter period of time, except when this data is used to strengthen the security or to improve the functionality of Our Service, or We are legally obligated to retain this data for longer time periods.
Transfer of Your Personal Data
Your information, including Personal Data, is processed at the Company’s operating offices and in any other places where the parties involved in the processing are located. It means that this information may be transferred to — and maintained on — computers located outside of Your state, province, country or other governmental jurisdiction where the data protection laws may differ than those from Your jurisdiction.
Your consent to this Privacy Policy followed by Your submission of such information represents Your agreement to that transfer.
The Company will take all steps reasonably necessary to ensure that Your data is treated securely and in accordance with this Privacy Policy and no transfer of Your Personal Data will take place to an organization or a country unless there are adequate controls in place including the security of Your data and other personal information.
Disclosure of Your Personal Data
Business Transactions
If the Company is involved in a merger, acquisition or asset sale, Your Personal Data may be transferred. We will provide notice before Your Personal Data is transferred and becomes subject to a different Privacy Policy.
Law enforcement
Under certain circumstances, the Company may be required to disclose Your Personal Data if required to do so by law or in response to valid requests by public authorities (e.g. a court or a government agency).
Other legal requirements
The Company may disclose Your Personal Data in the good faith belief that such action is necessary to:
- Comply with a legal obligation
- Protect and defend the rights or property of the Company
- Prevent or investigate possible wrongdoing in connection with the Service
- Protect the personal safety of Users of the Service or the public
- Protect against legal liability
Security of Your Personal Data
The security of Your Personal Data is important to Us, but remember that no method of transmission over the Internet, or method of electronic storage is 100% secure. While We strive to use commercially acceptable means to protect Your Personal Data, We cannot guarantee its absolute security.
Children’s Privacy
Our Service does not address anyone under the age of 13. We do not knowingly collect personally identifiable information from anyone under the age of 13. If You are a parent or guardian and You are aware that Your child has provided Us with Personal Data, please contact Us. If We become aware that We have collected Personal Data from anyone under the age of 13 without verification of parental consent, We take steps to remove that information from Our servers.
If We need to rely on consent as a legal basis for processing Your information and Your country requires consent from a parent, We may require Your parent’s consent before We collect and use that information.
Links to Other Websites
Our Service may contain links to other websites that are not operated by Us. If You click on a third party link, You will be directed to that third party’s site. We strongly advise You to review the Privacy Policy of every site You visit.
We have no control over and assume no responsibility for the content, privacy policies or practices of any third party sites or services.
Changes to this Privacy Policy
We may update Our Privacy Policy from time to time. We will notify You of any changes by posting the new Privacy Policy on this page.
We will let You know via email and/or a prominent notice on Our Service, prior to the change becoming effective and update the “Last updated” date at the top of this Privacy Policy.
You are advised to review this Privacy Policy periodically for any changes. Changes to this Privacy Policy are effective when they are posted on this page.
Contact Us
If you have any questions about this Privacy Policy, You can contact us: support@protonet.com
Mobile File Synchronisation Using WebDAV Navigator
You can use WebDAV Navigator to access data easily from anywhere on iOS or Android devices.
Multiple transfer destinations can be selected and the desired data synchronised with the server at the press of a button.
This functions in both directions and is fully configurable.
The following videos show to establish a connection to the Protonet Box and choose a destination for synchronisation. A group with the name “Smartphone” and a folder with the name “Pictures” is created on a testbox for this purpose.
Synchronise Smartphones Photos with a Protonet Solution
PhotoSync is available for both iOS and Android devices and offers image/video transmission (for different purposes) at the press of a button as well as fully automated data transfer.
At least one transfer destination is specified and the content of the selected image folder transferred in either a manual or location-dependent fashion. The program can ascertain whether a WLAN connection is required and whether (for example) the image quality should be reduced during mobile data transfer, or videos should remain unsynchronised.
Protonetiquette
In order that the exchange and flow of information occurs smoothly, we’ve established a set of rules known as “Protonetiquette”. We ask all members of the support forums to adhere to these rules.
5 Our requirements for posting in the forum:
- Before you create a new post, please check whether your question/your topic has already been discussed. You can use the search function to do this. For non-listed errors that appear to require further analysis, please get in touch directly with the support team.*
- Express your issue as clearly and precisely as possible, since this will enable you to receive a rapid response.
- Leave feedback/feature requests only in the form provided for this purpose. Background information can be found here. This ensures, for example, that valuable contributions are not lost amongst incoming comments.*
- Respect the contributions of other and participate only when you have something to contribute to the topic.*
- Let other share in your experiences.
* Protonet Support (which acts as moderator) reserves the right to remove double posts or unsuitable posts.
Button flashing red – what does it mean?
As soon as a Protonet box cannot be started as normal, it starts up in rescue mode.
In this mode, the start button may flash red at one of two different speeds:
- Very rapid flashing (meaning that neither an internal stick nor a hard disk has been detected): Please contact Protonet Support directly for further analysis!
- Flashes two times per second (means that no hard disk has been detected)
If the button flashes more slowly: a live system will be started. After a few minutes, a WLAN with the name “protonet” will appear. You can connect to this network to find out more details.
Log Entries and What They Mean
“Forced booting into resuce!”
A “rescue” file has been found on the USB stick. The system understands this as a command to start in the RescueSystem.
“Protonet Storage could not be created!”
Protonet Storage ZFS could not be “installed” on the hard disk. The hard disk may be formatted, broken or not connected.
“No Protonet Firmware found on LiveFS.”
No Protonet firmware (file with the file ending .firmware in the USB stick folder /firmware) could be found. Stick may be defective or tampered with.
“Firmware Version ‘$firmware_name’ not found in ‘$firmware_on_storage_path'”
The firmware was found on the stick and extracted to the hard disk. $firmware_name corresponds to the name of the firmware as recognised by the USB stick. However, it appears as though the packed firmware in /protonet/firmware is called something else. As a result, /protonet/firmware/current cannot be created.
“Mount of firmware failed”
Firmware cannot be found/mounted on the hard drive.
“Modprobe squashfs failed.” or “Modprobe overlayfs failed.”
Software on the internal stick is defective.
“Compose of root-overlay failed.”
Hard disk and copy-on-write cannot be merged as part of a root file system.
“Move storage failed.”
Mount point of the hard disk could not be moved to /protonet.
“Move stick failed.”
Mount point of the USB stick could not be moved to /protonet-stick.
“Modules copying failed.”
Kernel modules could not be copied in the system to be started.
“Please bring me home! Couldn’t mount my roots, feel lonely.”
Only seen if a monitor is connected. Live System not found from the USB Stick. USB stick defect. Contact support.
Wie stelle ich ein, für was ich Benachrichtigungen erhalte?
In allen Objekten (Themen, Aufgaben, … ) unter Optionen bzw “…” können die Benachrichtigungen dafür jeweils ausgeschaltet werden. Schaltet man die Benachrichtigungen über das Zahnrad einer Gruppe aus, wird das auf alle Objekte darin vererbt. Diese Einstellungen gelten nur für den eigenen User.
Beispieltermin:
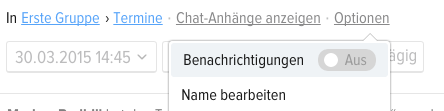
Hiermit werden Benachrichtigungen, die diesen Termin betreffen, abgeschaltet. Also auch die Terminerinnerungen per Email.
Ausnahme: Im Chat dieses Termines wird jemand per @vorname.nachname angeschrieben.
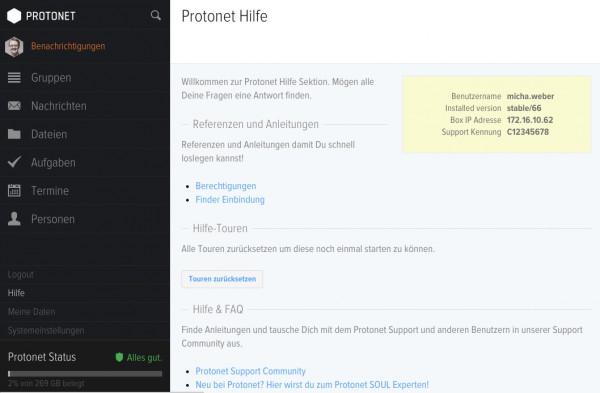
Where can I find the support identifier and SOUL version?
Since SOUL 2.24 (stable/64), essential information has been available to all registered users in the yellow boxes on the help page.
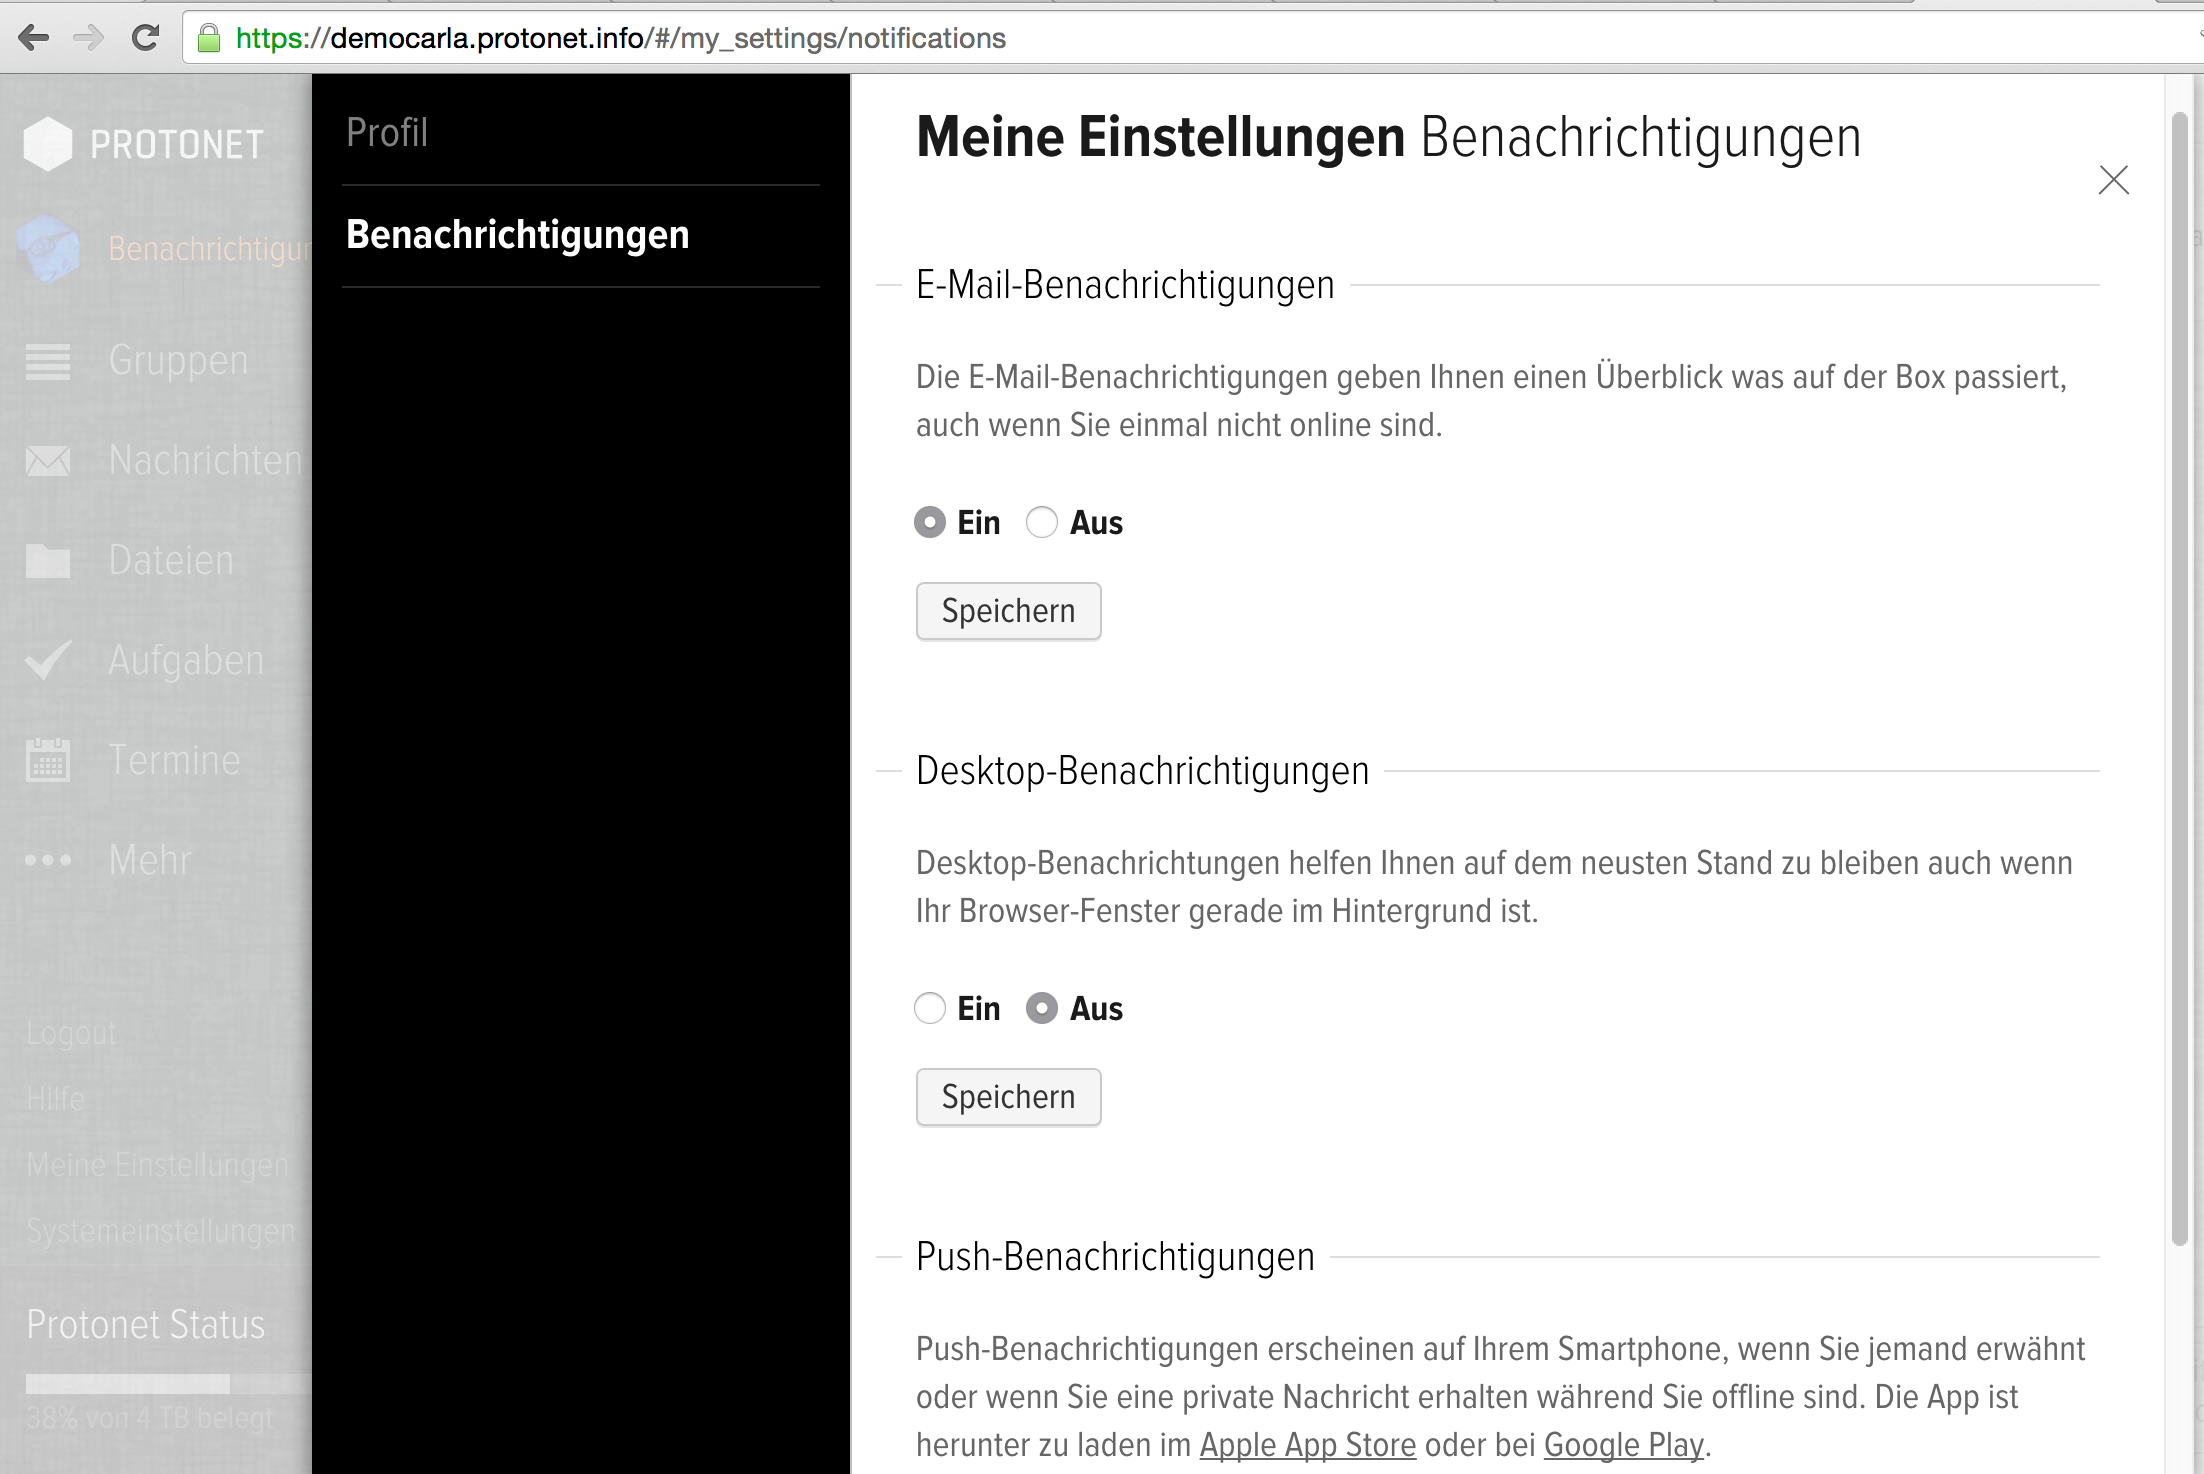
Which notifications can I be receive outside of SOUL?
In their profile, users can choose what type of notifications they would like to receive.
- Desktop notifications
- Emails
- Push notifications to the Protonet Messenger App
Email notifications are sent under the following conditions:
- A user is offline and, during this time, is sent a private message, assigned a task, reminded of an appointment or meeting (15 minutes before the start time) or mentioned with @.
- A user was online in SOUL, but has new mentions, private messages or task updates that have not yet been viewed.
In this case, an email will be sent as soon as the user logs out of SOUL or closes the browser.
- All registered users will be informed if the protonet.info internet address of the box has changed.
- Administrators receive an email if the maintenance password is changed.
Push notifications are sent for private messages and @ notifications in group chats or topics. They are sent approx. 1 minute after the last message.
Requirement: The recipient must not be logged onto SOUL at the same time.
Support Process
To receive support, you must file a support ticket containing all available information on the incident or problem at support.protonet.info. You should also specify a support identifier or solution owner and the software versions of relevant programs and operating systems. We recommend that you give the names and contact information of any technical employees who are familiar with the problem/incident and the IT environment. In the first instance, users should clarify questions and problems with the owner of the solution.
The Support Portal offers a search function for existing information and instructions and the user forum. We highly recommend making use of it, especially outside the support times.
The Protonet Support Team
Protonet does not use a call centre and instead staffs all support positions with specialist personnel from the fields of programming, IT administration, system electronics and consulting. Protonet Support is known for its speed of service and often goes above and beyond what is strictly necessary.
Markus Badberg
Position: Technical Support Engineer
Felix Favre
Position: Technical Support & QA Engineer
Position: Head of Customer Support
Telephone Support
In case of emergencies (please refer to the definition given below), customers with the Gold service package can call the number shown on the contact form or, for an emergency at Priority Level 1 or 2, issue a callback request.
The more detail you can give about the problem in writing when you first contact us, the better our support team can prepare for your consultation. This also helps us to plan an adequate amount of time for your consultation (particularly if it falls outside of regular support times) and thus to guarantee the best possible standard of support.
If you have opted for the Silver or Bronze service package, a telephone consultation may be offered at the discretion of our support team.
Protonet Support is not reachable via the general Protonet contact number; similarly, this number cannot be used to request callbacks or to request to be forwarded to other departments.
| Priority Level | Silver Service Package | Gold Service Package |
| Priority Level 1 – Emergency, total failure | – | Emergency number/ Callback request |
| Priority Level 2 – Significant impairment | – | Callback request |
| Priority Level 3 – Support required | – | Callback request |
| Priority Level 4 – Inquiry/Non-critical issue | – | – |
| Setup support via telephone | Up to 1 week from delivery | Any time |
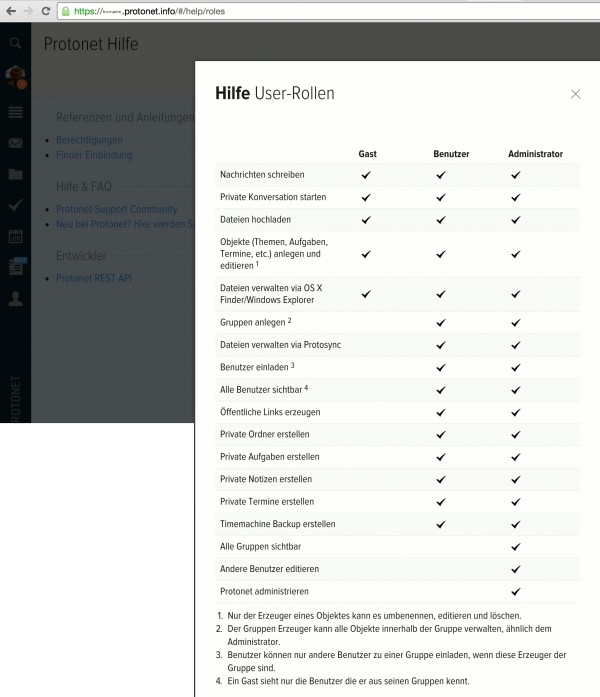
How do I set different permissions?
Permissions are determined via user roles and the ownership of objects.
By default, the “owner” is the creator of a group, task, etc.
The role of group owner can be passed to another group member, thus enabling SOUL users to invite/add users and modify group settings.
SOUL guests are therefore afforded the opportunity solely to make adjustments to sub-objects (themes, tasks and task lists, appointments and file folders).
Similarly, ownership can be passed within objects (tasks, themes, appointments, …) – for example, when a person leaves the project.
SOUL administrators can adjust the roles of any user within their user profile or the user overview. Specific permissions for individual user roles can be set in the current overview, which is located below the help page in SOUL:
How can I represent projects in SOUL?
There’s no one definitive answer for this: Some people define groups as projects, others create a separate task list for each project. Some people focus more on the exchange of data, others on communication.
What’s the best way to get started once the initial setup wizard is complete?
We’ve found that a good way to get started is to create 1-2 test groups in SOUL, thereby enabling users to familiarise themselves with the various functionalities in a relaxed setting. Where required, this process can be supported by our training videos and/or use cases.
After this, you can get started with your first “real” group or begin to explore the individual functions, e.g. shared task lists with multiple participants.
Maximum Response Times (First Response)
| Priority Level | Bronze | Silver | Gold |
| Priority Level 1 – Production down | – | 4 hours | 2 hours |
| Priority Level 2 – Significant impairment | – | 8 hours | 4 hours |
| Priority Level 3 – Support required | – | 16 hours | 8 hours |
| Priority Level 4 – Inquiry/Non-critical issue | – | 4 days | 2 days |
| Bronze Ticket* | 8 hours | ||
| Servicelevel unknown | 16 hours
(Except emergencies) |
||
Response times apply during the official support hours. The response time is defined as the period of time required for a support worker to return an initial response after receiving the support ticket. As such, the response times given in the overview above should be considered maximum times. The order in which tickets are dealt with depends on the service package and priority level of the ticket and the available support capacity.
*The processing of Bronze tickets can be subject to cost and will be calculated based on the current hourly rate for support and the number of hours required. The support engineer dealing with the case will inform you of any costs at the beginning of the process. The reporting and analysis of software failures is exempt from the above.
Priority Level
Classification of support requests according to priority level facilitates the optimal processing of support tickets according to complexity/urgency and ensures that all cases are given the necessary care and attention.
Priority Level 1 – Emergency, total failure
Use of the Protonet solution is limited to a business-critical degree or is completely impossible.
Priority Level 2 – Significant impairment
Use of the Protonet solution is generally possible, but is severely limited in certain areas.
Priority Level 3 – Support required
The Protonet solution is functional save for one particular issue.
Priority Level 4 – Inquiry/Non-critical issue
You have an inquiry, non-critical issue or non-critical software error pertaining to the Protonet solution. Where the nature of the problem allows, we recommend you begin by seeking an answer in the user forum. The forum enables Protonet uses to communicate at all hours of the day independently of the Protonet Support.
The support team may adjust the priority level of a request in the event of misuse of the system.
Remote Analysis
If direct access to the Protonet solution is required for analysis or repair purposes, a maintenance password will be created by the SOUL administrator (if not already known) and forwarded to the Protonet Support team. This is best done over the telephone.
If a new password is generated upon completion of the work, it will no longer be possible to access the server using the old one. The new password should be noted for emergencies and stored in a safe place.
CalDAV – Known limitations and issues
Known limitations
MacOS Calendar
- Passwords including spaces are not being accepted. Instead a credential failure is shown.
Solution: Change your password in your SOUL settings.
SOUL
- If an event is change, which already has been changed somewhere else but not yet synchronised, this new change will be overwritten with the not yet synchronized older one.
- SOUL is not showing who has changed the event from external calendar
Known issues SOUL
- Administrators can see a l l events in groups, they are a member of – even the events, they have been removed from
- The new name of a renamed group is not reflected via CalDAV
How long does it take until an event appears in SOUL?
If an event is being created externally via CalDAV, it might take up to 10 minutes until it is shown in SOUL.
Wenn ein Termin via CalDAV in einem externen Kalenderprogramm erstellt wird, kann es bis zu 10 Minuten dauern, dass dieser auch in SOUL angezeigt wird.
Any 10 minutes SOUL is checking, if there are any new events, which have been created or modified/deleted outside of SOUL.
Information regarding the CalDAV beta period
Starting with SOUL 2.18 SOUL users with role “Administrator”* can use the bi-directional calendar synchronization via CalDAV.
During the bet period, we only support the following calendar tools, we tested succesfully*:
- Apple MacOS Kalender (Yosemite, El Capitan, macosSierra)
- Apple iOS Kalender (iOS 9, iOS 10)
- Microsoft Outlook 2016 mit Plug-In Outlook CalDav Synchronizer
- Android 6 und neuer mit Plug-In CalendarSync
You need the following date to configure these:
Server address: https://my-address.protonet.info or try https://my-address.protonet.info/caldav
User name: vorname.nachname
Password: SOUL password
*We are going to provide access to the CalDAC functionality to users and guests as well also support further calendar software in one of the next updates. In case you would like to test further software before, in case of errors the vendor might be able to assist you.
CalDAV – SOUL calendar on MacOS
We are going to provide a video in English at the soonest.
CalDAV – SOUL calendar on Windows
Following screenshots have been taken from Microsoft Outlook and the Plug-In “Outlook CalDav Synchronizer”: https://sourceforge.net/projects/outlookcaldavsynchronizer
- Choose Generic CalDAV
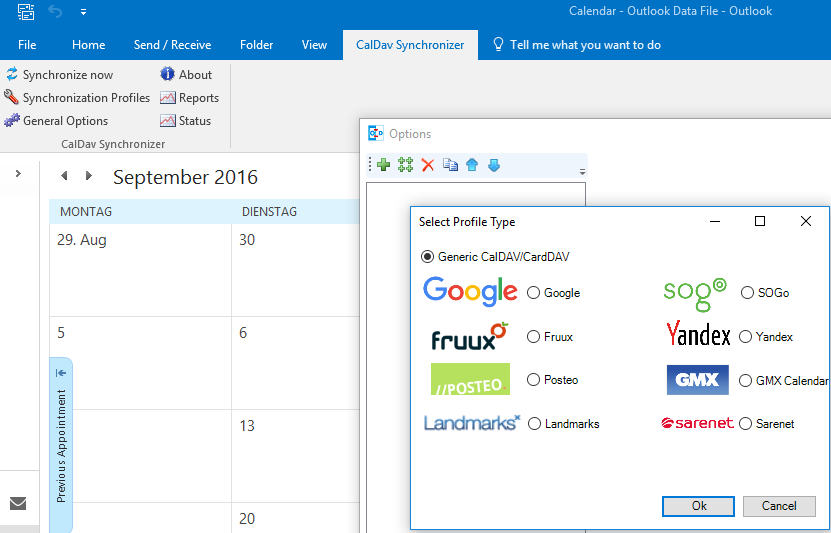
- Choose the Outlook calendar to be synchronized
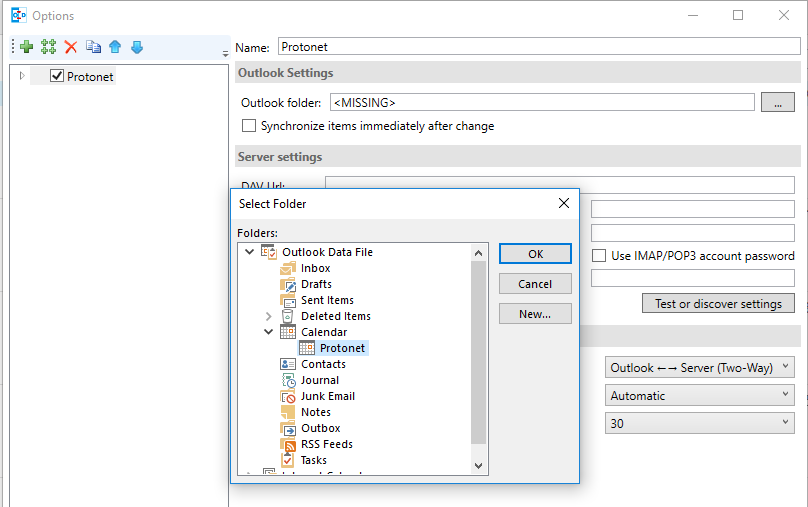
- Add the Protonet Server and your user information
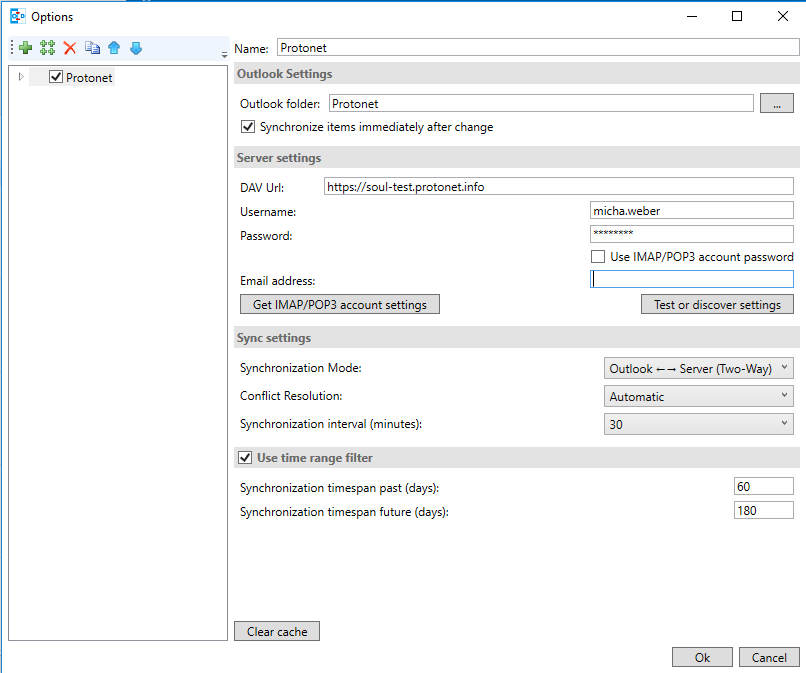
- Press “Test or discover settings”
- In the following Window choose the SOUL calendar, in which the datayou create in the Outlook calendar selected earlier shall be synchronized.
CalDAV – SOUL calendar on Android devices
Following PlugIns’s have been tested successfully on Android 6
Server address: https://my-address.protonet.info or try https://my-address.protonet.info/caldav
User name: vorname.nachname
Password: SOUL password
How-to link existing files into the chat
This video includes
- Creating a user in an existing goupd
- Uploading files into this new folder via SOUL and the queueing
- Adding users already registered to the group
- Using the chat including the @All notification
- Linking an existing file into the chat by using the switch “Share existing files”
SOUL Backup in progress
- How-to check the status of a SOUL backup in progress
Teamviewer Quick Support Download
For analysis reasons it might be necessary to remote connect to your computer.
The Teamviewer 10-QuickSupport Client does not need any installation and can be downloaded below. The remote connect to your computer is protected by a personal ID and password. As soon the teamviewer session is over, Support cannot longer access your computer.
Please choose your operating system below:
Set static IP-Address and network information (SOUL 2.x on CoreOS)
- Connect to the server via ssh or command line
User: platform
Password: Current maintenance password - Identify the active network
Run following command and check the output of the first 8 entries:
ip addrThe active network interface is marked with “
state UP“.
In our example below entry no.2 reflects the active network interface. - Get the MAC-address (link/ether) from this entry. In our example “0c:c4:7a:c4:ab:bc” would be the correct one.
- Next create a configuration file containing the desired network information and open it in VIM editor:
sudo vim /etc/systemd/network/static.network
Pressing the key “i” enables you to edit the file. Now add the following content – but of course with your specific network information:[Match] MACAddress=0c:c4:7a:c4:ab:bc[Network]
Address=192.168.0.15/24
Gateway=192.168.0.1 - After filling sections “MACAddress”, “Name”, “Adress” and “Gateway” with your specific values, save the file:
- Press key “esc”
- Type “
:x” and press “Enter”
- Activate the new configuration with following command:
sudo systemctl restart systemd-networkd
Example output ip add
platform@testserver ~ $ ip addr
1: lo: <LOOPBACK,UP,LOWER_UP> mtu 65536 qdisc noqueue state UNKNOWN group default qlen 1
link/loopback 00:00:00:00:00:00 brd 00:00:00:00:00:00
inet 127.0.0.1/8 scope host lo
valid_lft forever preferred_lft forever
inet6 ::1/128 scope host
valid_lft forever preferred_lft forever
2: eno1: <BROADCAST,MULTICAST,UP,LOWER_UP> mtu 1500 qdisc mq state UP group default qlen 1000
link/ether 0c:c4:7a:c4:ab:bc brd ff:ff:ff:ff:ff:ff
inet 172.16.12.209/16 brd 172.16.255.255 scope global dynamic eno1
valid_lft 81215sec preferred_lft 81215sec
inet6 fe80::ec4:7aff:fec4:abbc/64 scope link
valid_lft forever preferred_lft forever
3: eth1: <NO-CARRIER,BROADCAST,MULTICAST,UP> mtu 1500 qdisc mq state DOWN group default qlen 1000
link/ether 0c:c4:7a:c4:ab:bd brd ff:ff:ff:ff:ff:ff
4: wl_private: <BROADCAST,MULTICAST,UP,LOWER_UP> mtu 1500 qdisc mq state UP group default qlen 1000
link/ether 00:0e:8e:6d:78:0b brd ff:ff:ff:ff:ff:ff
inet 10.42.0.1/16 brd 10.42.255.255 scope global wl_private
valid_lft forever preferred_lft forever
inet6 fe80::20e:8eff:fe6d:780b/64 scope link
valid_lft forever preferred_lft forever
5: eth2: <NO-CARRIER,BROADCAST,MULTICAST,UP> mtu 1500 qdisc mq state DOWN group default qlen 1000
link/ether 0c:c4:7a:c4:ae:28 brd ff:ff:ff:ff:ff:ff
6: eno2: <NO-CARRIER,BROADCAST,MULTICAST,UP> mtu 1500 qdisc mq state DOWN group default qlen 1000
link/ether 0c:c4:7a:c4:ae:29 brd ff:ff:ff:ff:ff:ff
7: br-257682b47eea: <BROADCAST,MULTICAST,UP,LOWER_UP> mtu 1500 qdisc noqueue state UP group default
link/ether 02:42:bc:d5:c8:34 brd ff:ff:ff:ff:ff:ff
inet 172.18.0.1/16 scope global br-257682b47eea
valid_lft forever preferred_lft forever
inet6 fe80::42:bcff:fed5:c834/64 scope link
valid_lft forever preferred_lft forever
8: docker0: <BROADCAST,MULTICAST,UP,LOWER_UP> mtu 1500 qdisc noqueue state UP group default
link/ether 02:42:38:6a:28:6b brd ff:ff:ff:ff:ff:ff
inet 172.17.0.1/16 scope global docker0
valid_lft forever preferred_lft forever
inet6 fe80::42:38ff:fe6a:286b/64 scope link
valid_lft forever preferred_lft forever
Information for creating custom backup scripts (SOUL on CoreOS)
Please note: The following information are related to SOUL 2.x running on CoreOS
Implementing a custom backup script requires linux skills. Following information are intended to be used by experienced administrators and service providers.
# Setting up custom backup
## What needs to be backed up?
All user data and box configuration is stored in these two file system paths:
* `/data`

* `/etc/protonet`
## How can I run a periodical backup?
*See also the CoreOS documentation: https://coreos.com/os/docs/latest/scheduling-tasks-with-systemd-timers.html*
Create a task that performs your desired backup – obviously also make sure that authentication is set up correctly,
for example that the user root has an SSH public key deployed to the target host in this example.
# File: /etc/systemd/system/custom-backup.service

[Unit]
Description=Makes a backup to a remote host
[Service]
Type=oneshot

ExecStart=/path/to/backup-program --with-proper-arguments-for-sync
Create a systemd timer. See also the Arch Linux Wiki: https://wiki.archlinux.org/index.php/Systemd/Timers for details
on the various available timers.
# File: /etc/systemd/system/custom-backup.timer

[Unit]
Description=Run custom-backup.service once a week
[Timer]
OnCalendar=weekly

Persistent=true
Creating your own backup is handled as a custom specific change which is not reflected within default support range. If you need help implementing or maintaining such a change, we can get you in touch with our technical partners.
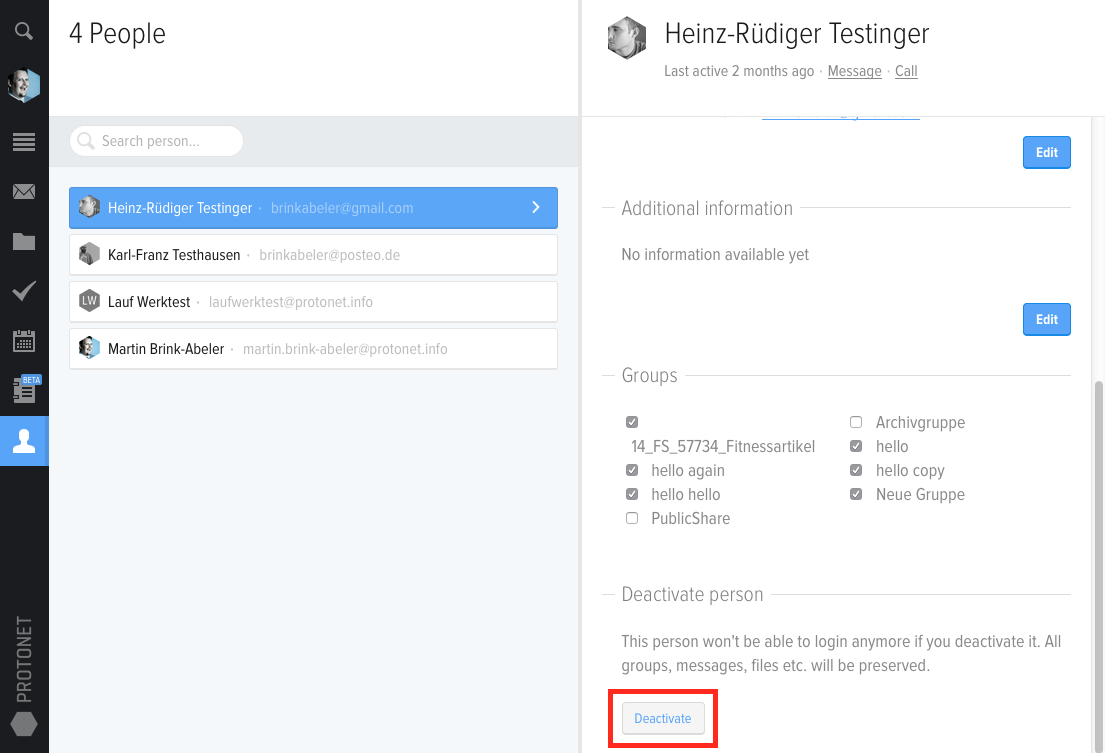
How can I deactivate users?
I’m having trouble connecting to the Protonet solution. What should I do?
This can have different causes
- Issues or restrictions on the computer you are using
- The internet access the solution is connected to is down or slow
- Cables are not plugged in correctly
- There are network changes or issues
- Protonets proxy infrastructure is under maintenance
Note: In case of issues or limitations regarding the proxy infrastructure, we will post information here on the main page and within the news section.
Troubleshooting checklist
- Am I the only one experiencing the issue?
- Can the box be reached by using its internal IP address?
- Is the box switched on and the network cable attached to the network outlet / switch / router?
- The easiest way to check whether the box is connected to the router correctly and can establish a connection to the internet is to open the update page within the system settings. If it loads correctly, the network setup and cables are fine.
- When that is not the case please check whether the box is listed correctly in your routers interface.
- Is there an external hard drive or memory stick still connected to your box?
- Please remove it and restart the box via its button (one short press should suffice). Retry connecting to it after about 10 minutes.
- Was the box’s web address changed?
- Has a firewall been set up or changed?
- Does the internet connection that the box is using work?
- The easiest way to check whether the box is connected to the router correctly and can establish a connection to the internet is to open the update page within the system settings. If it loads correctly, the network setup and cables are fine.
- If this is the case: Go to the system settings and switch off the internet address, save and wait one minute. Switch it back on and save again. By doing this – or better even, restarting, the connection to our proxy is forced to refresh and your server should be reachable again afterwards.
- Every 30 restarts, the box performs a file system check to make sure all data on it is without error.
- This can delay the servers start up to 45 minutes.
- You can verify that this is the case by connecting a display. A reboot does not skip it.
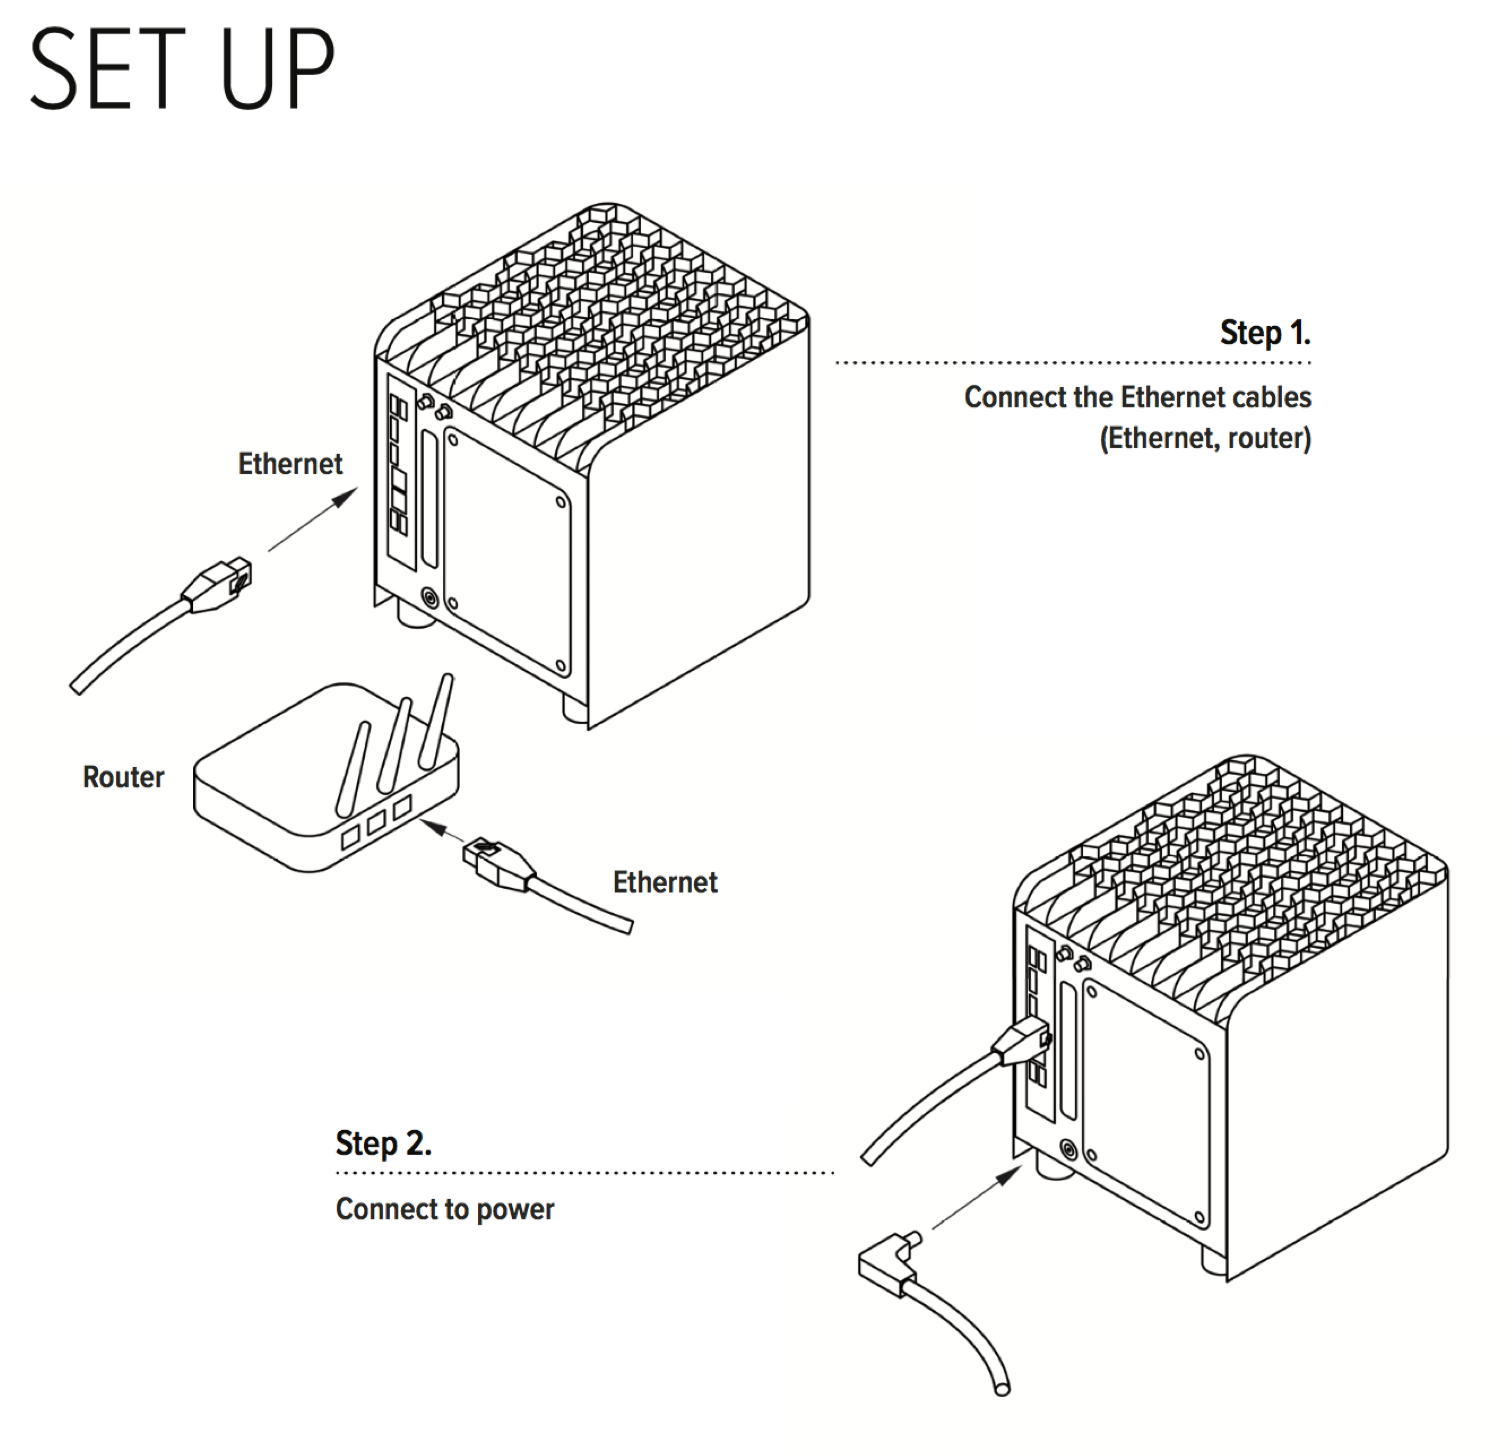
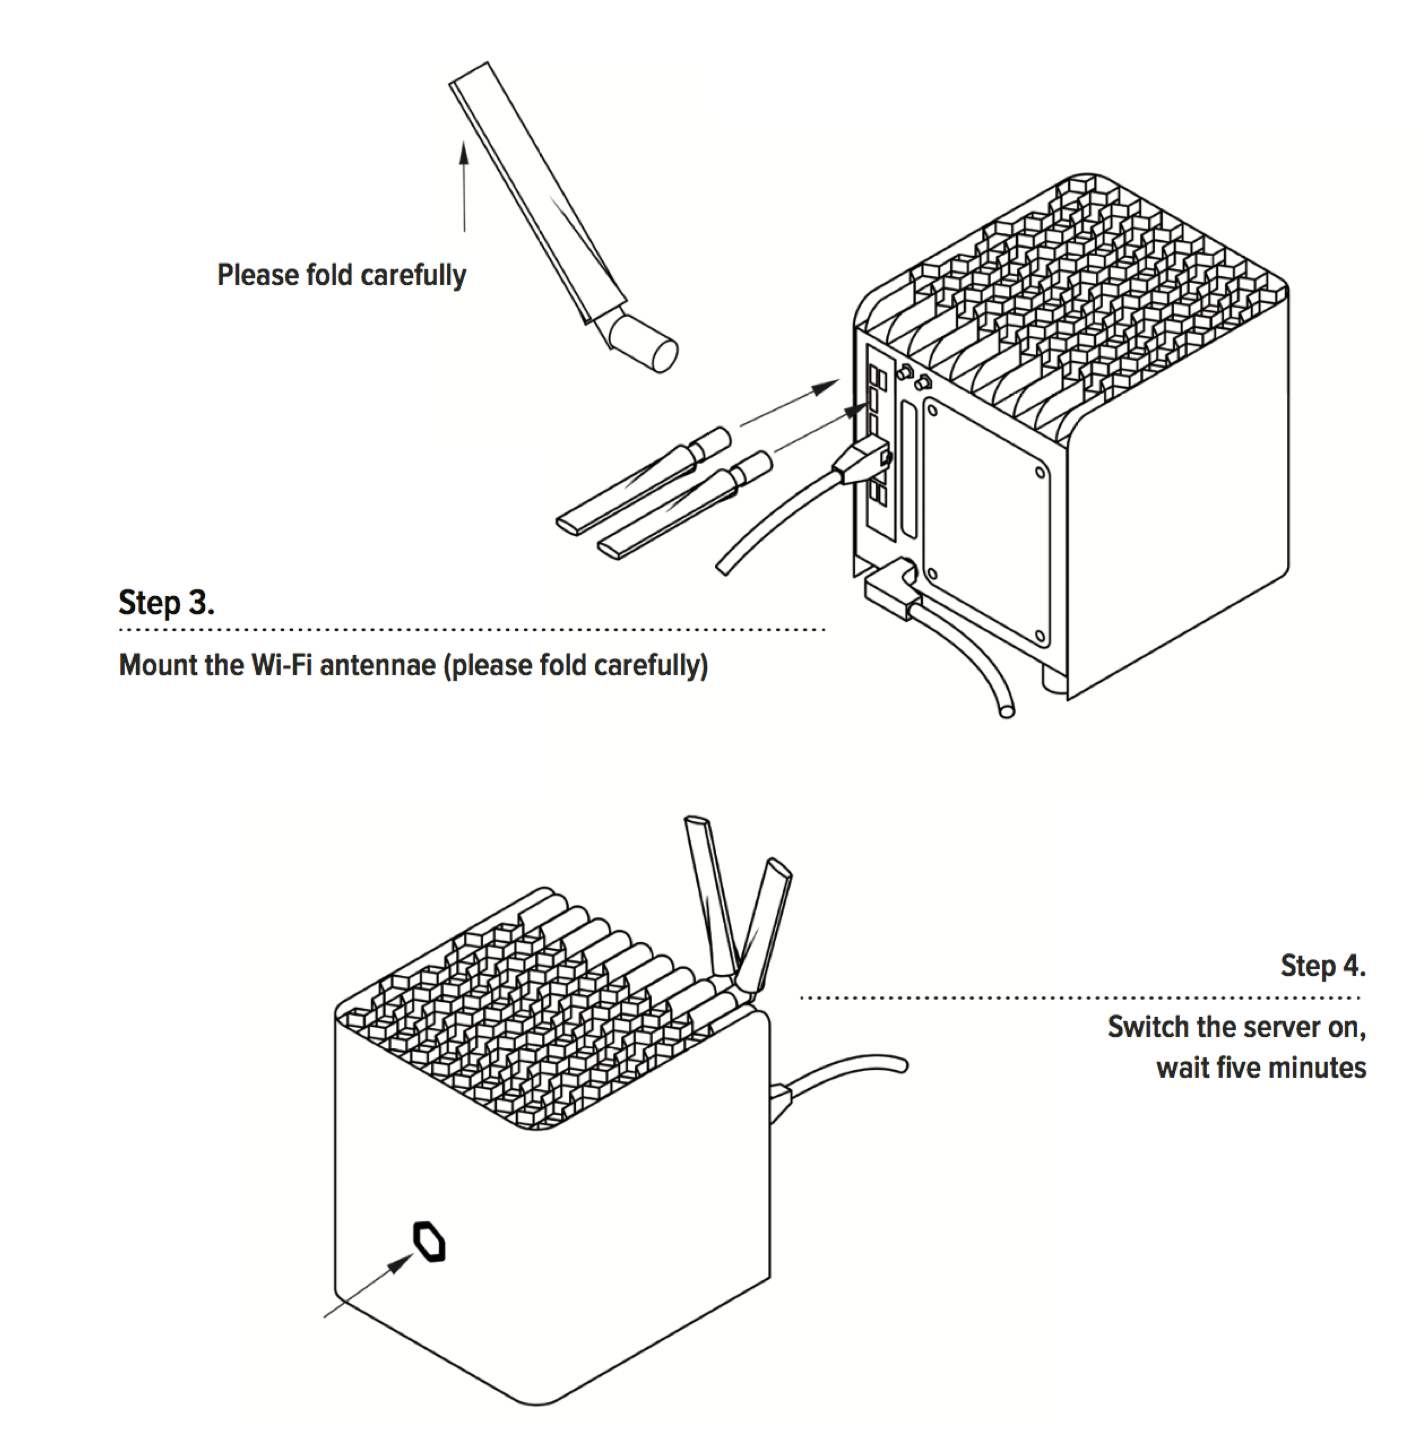
How to connect and setup Protonet servers?
Protonet Serves are being delivered with a user instruction brochures covering the setup and initial steps:
The brochures contain the following instructions:
Maya
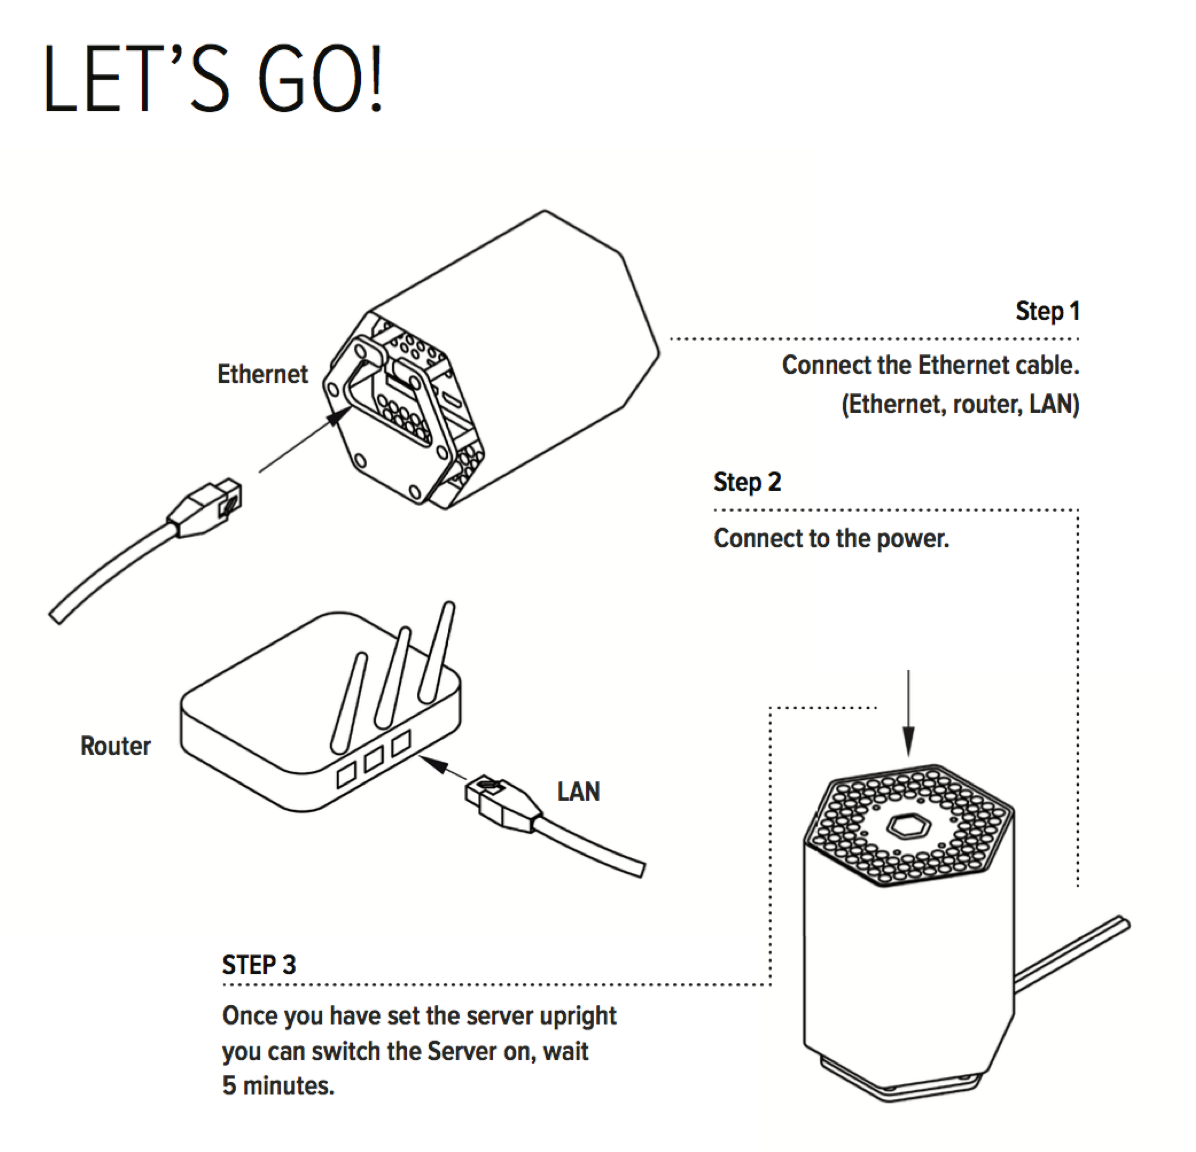
Carla/Carlita
Which Protonet apps are available and where can I download them?
ProtoSync for MacOS/Windows – Synchronise the private ProtoSync folder
- Download from the Files section in SOUL (only for the User and Administrator roles)
Protonet Messenger for iOS/Android – Mobile access to private messages, topics and group chats
- iOS – Apple iTunes App Store
- Android – Google Play Store
- APK-Download 2.3.1
Protonet Files for iOS/Android – Mobile file access to your Protonet server
Minimum requirement: Protonet server running SOUL 2.17
- iOS – Apple iTunes App Store
- Android – Google Play Store
- APK-Download 1.1
Using special characters in group names or folder names
The possibility of using special characters in group or folder names has been limited to avoid incompatibilty issues in Mac Finder or Windows Explorer.
Such typical known issues might be:
- Folders or files are not shown at all
- Folders or files are shown but with incorrect/gibberish names
- Folders or files flicker or suddenly disappear on the screen
- Synchronization might fail
Since SOUL 2.5 following characters cannot be used any longer in SOUL:
. , ; : [ ] { } ( ) “ ‚ ` * ! ? < > | / \ $ % & ä ö ü Ä Ö Ü ß
We highly recommend
- not using these characters in any files or folder, being created or store via Finder/Explorer
- renaming any group and foldernames created in earlier versions than SOUL 2.5
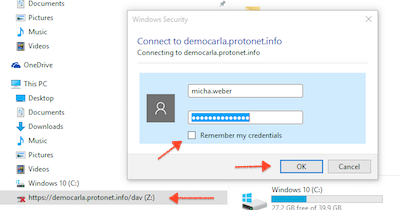
Protonet WebDAV integration into Windows Explorer
This how-to is about mapping the Protonet solution as a network drive in Windows Explorer using the WebDAV protocol. This enables accessing the data stored in groups, private folders and volumes. The complete web address and user name can be looked up in SOUL in the “Help” section, “Explorer integration”. Next follow the arrows on the screenshots.
Prerequisites
- At least one folder or network share defined for this user in the Protonet solution.
How-to:
- Do a right click on Network
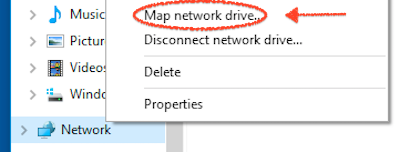
- Provide the WebDAV-Patch, ensure both (!) checkboxes are checked
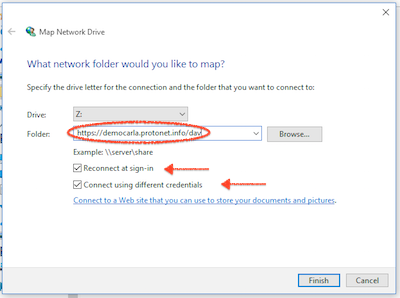
- In case of following issue occurring, start the WebClient service and switch to automatic startup.*
Move on directly with 4. if there is no error message.
- Provide the SOUL user name & password. Activate the checkbox.
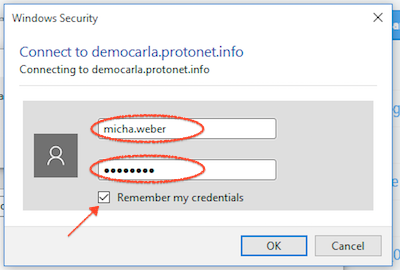
- We’re done
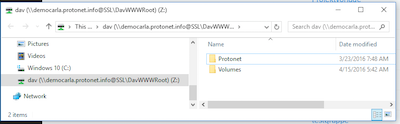
- After rebooting the computer, the login information might need to be verified again
*In case of further issues the local administrator should be involved. There might be restrictions in the network which hinder you on setting up WebDAV connection (policies, personal firewalls, …)
What can be found using the search functionality?
There are two types of search in SOUL:
- The first one can be found within the feature overviews (such as topics) and only searches for object names. This provides a quick search and selection when the feature contains many objects.

- The second is located in the upper left corner of SOUL in form of a magnifying glass. Using this, any group and object names, user names as well as all communication streams and messages can be searched for.
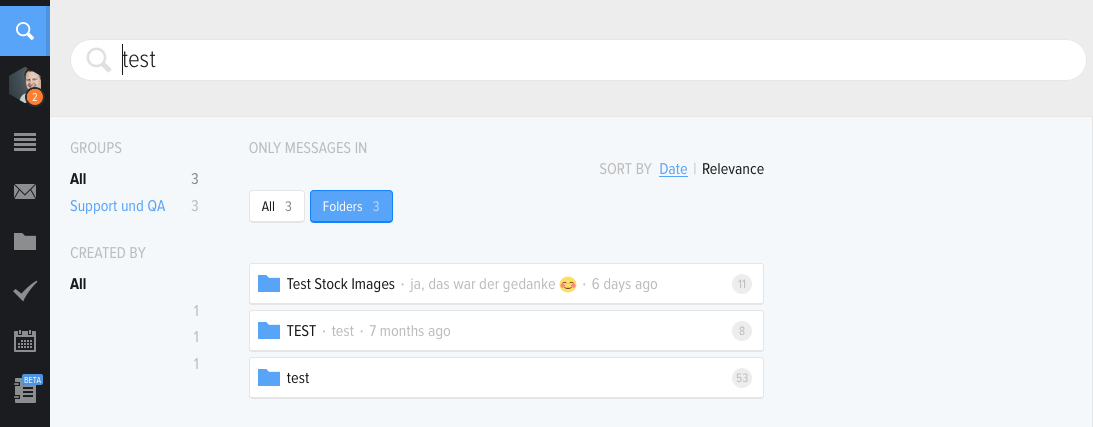
There is no dedicated search functionality for files stored in volumes or directories yet.
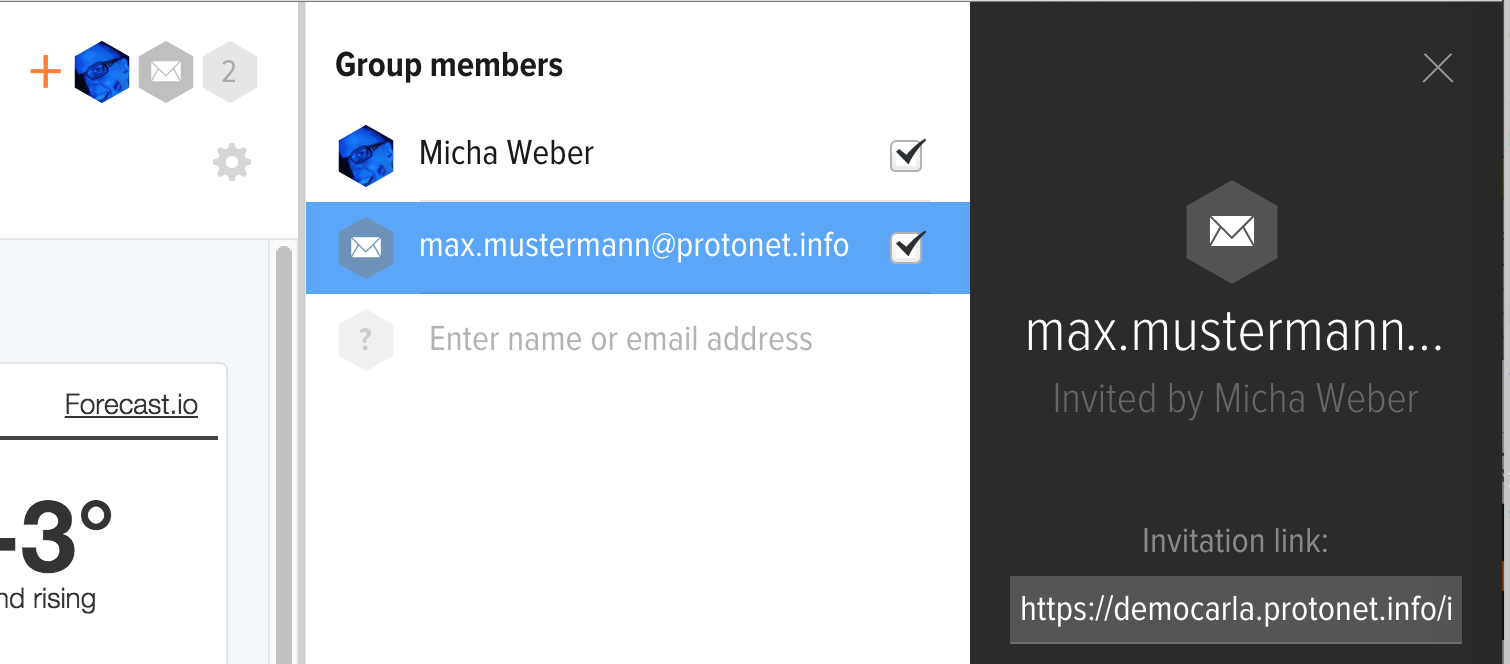
I haven’t received the invitation email. What should I do?
In case the invitation email has not been received, please have a look at the spam folder.
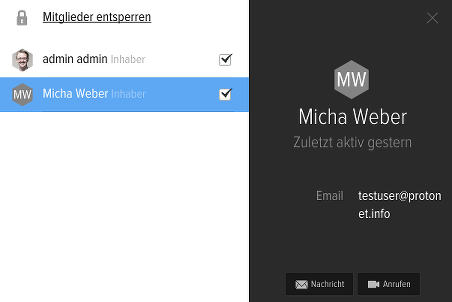
Alternatively, the group owner or a SOUL administrator can lookup the registration link and send it to the invitee again:
Simply navigate to the group the person has been invited to and in the member list click on the mail icon next to his/her email address.
Notifing users in chats via @-mentions
To address other users in chats or to make sure they do not miss a message, they can be notified using @-mentions.
Just enter the @ symbol in any chat window and a selection popup will appear.
For space reasons, only five users will be displayed after the All initially.
The selection will be narrowed down with every character you type. Users on the list can be clicked by mouse or selected by arrow keys and pressing Enter.
For Example: to notify Ali Jelveh it is usually sufficient to type @Ali.
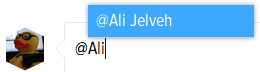
Successful notifications result in the @Firstname Lastname being displayed in bold.
Note: Copy&Paste of @Firstname Lastname will not result in a notification.
Protonet Messenger – Featureset
The Protonet Messenger for iOS and Android enables you to read and send messages, photos, videos and share your current location while all files remain on your Protonet server.
All features:
- Private messages
- read, send messages
- Location sharing
- Group chats
- read, send messages
- Create groups (if you have the User or Administrator role)
- manage members
- Topics
- read, send messages
- create
- manage members
- Receive push notifications
- Private messages
- @-notifications from group chats and topics
- Send and receive photos and videos
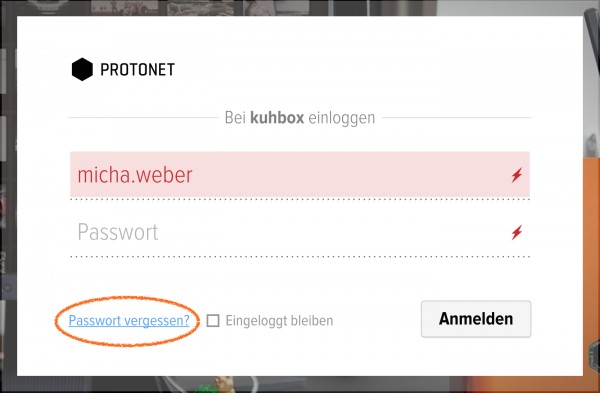
I forgot my password
The “Forgot your password?”-link is right on the SOUL login page on the lower left corner of the login form. After you click it and fill in your email address, an email will be sent to you that can be used to reset your password.
A little reminder on the email address you used in SOUL
- You can ask any user that shares a group with you or an administrator to take a look in your profile and check which address you have used.
- In case the address is no longer valid, a SOUL administrator can change it for you.
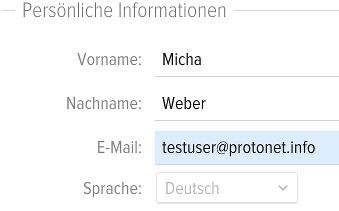
- As soon as a valid email address is stored in your profile, you can use the “Forgot your password?”-link.
- An email with a link to reset your password along with instructions should arrive shortly.
ProtoSync – Known issues
- Hidden files with a dot in front of the file name from Mac and Linux computers are displayed in Windows.
- Windows users can experience problems if they are not administrators and are not the user who installed ProtoSync.
ProtoSync: Examples & Troubleshooting
This list of troubleshooting tips will be extended over time.
Basic information for operation of the app:
- Old Protonet and ProtoSync apps must be completely removed in order for ProtoSync to work correctly. Old apps are not supported.
- The ProtoSync folder is located directly in the user directory.
- ProtoSync currently only works with Protonet servers that use a .protonet.info address – not custom domains or DynDNS addresses.
- The server software SOUL must be updated to the current version (at least SOUL 2.11 stable/84) for ProtoSync to work.
- Some characters in passwords (i. e. §) can cause problems when logging into the app.
- Old versions of the SSH public key tutorial are not compatible with ProtoSync. The new tutorial must be used in order for ProtoSync to work.
- Special characters in file names should be avoided. Apple has good advice regarding this: https://support.apple.com/de-de/HT202808
Dots do not cause problems except at the beginning of the file name.
If the app is set up but does not synchronize files:
- If the app does not work after the first installation, a restart of the app, a reinstallation or a reboot of the computer can help.
- Try starting with small and single files and then increase the amount of data.
- If the app has worked before but apparently stopped syncing, the cause might be the last files and folders placed in the ProtoSync folder. Please check these and look out for special characters in file and folder names. Change these characters for test reasons.
- If the ProtoSync folder is deleted or cleared out completely, it must be reconfigured using the Reset Configuration option in the tray menu. It is advisable to empty the folder using the SOUL web interface instead of the local folder.
SSH access over the internet
The easiest way to establish an SSH connection to the Protonet server with a unix-compatible OS (MacOS, Linux) over the internet is to use an alias:
alias nodessh=’ssh -o “ProxyCommand nc -X connect -x ssh.protonet.info:8022 %h %p” -o “User protonet” -o ServerAliveInterval=15 -o ServerAliveCountMax=3′
It can be persisted in the .bashrc-Datei in the users home directory. Connections can be created as follows:
nodessh SERVERNAME
SERVERNAME means here the Protonet address without “.protonet.info” – SERVERNAME.protonet.info
Within Windows it is easiest to use the tool Putty.
Enter the servers web address without the tailing .protonet.info like this
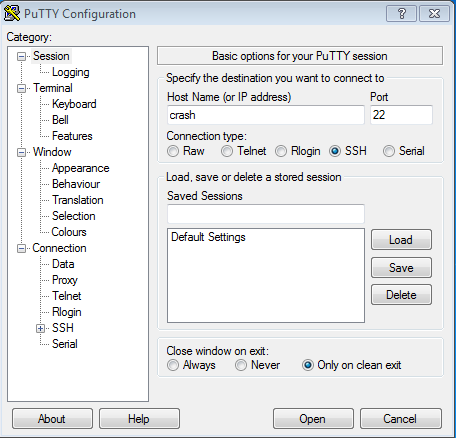
Set the user name to protonet:
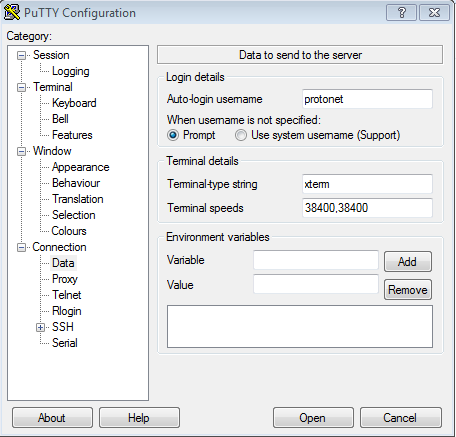
Finally, enter the HTTP Proxy ssh.protonet.info and the following command, as can be seen on the image below:
plink -nc -X connect -x proxyhost %host %port
Pressing “Open” creates a console window that will ask for your servers maintenance password.
Maintenance password – what is it for?
The maintenance password is like a master key to the Protonet box. In the end of the setup assistant, when the web address has been set successfully, it is generated as a random value without being displayed and we at Protonet do not know it.
For maintenance reasons and as a general precaution the box owner should generate a maintenance password and store it in a secure place like a password manager. The maintenance password is necessary to access the server when software or hardware need to be analysed by support.
SOUL administrators can generate a new maintenance password via System settings > Maintenance. Each maintenance password is only valid until a new maintenance password is generated or set manually.
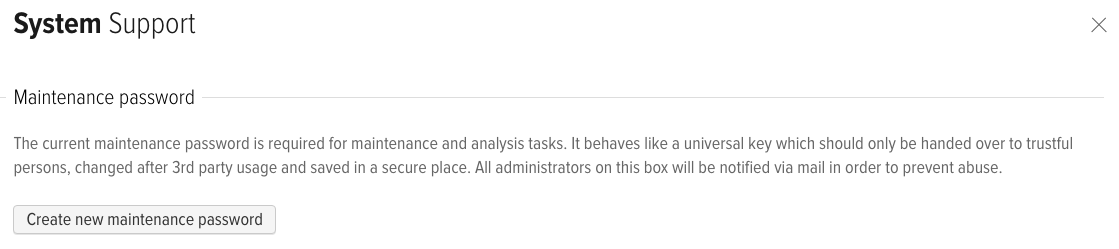
On the command line, the command masterpassword can be used to set a custom maintenance password manually. This password is valid for the user protonet.
How can I transfer files to my Protonet server?
This article explaines how to move files from a NAS, MAC, Windows PC, external hard drives and so on to the Protonet server.
First, choose a destination for your files on the Protonet server. That could be a folder in a group or a network volume.
- You can create a group and a folder in that group via its Files section. Only groups that have folders within them can be seen over SMB and WebDAV in Windows Explorer and MacOS Finder. In this example, the group name is Backup2016 and the folder name is FileStorage.
Next, the target has to be added as a network drive in your file explorer. There are different ways to do this for different operating systems:
Instructions can be found in SOUL navigation bar under Help and then either Explorer integration or Finder integration.
Within Explorer or Finder, navigate to the folder you created and copy the files you want to transfer into this folder.
- In this example, the folder structure looks like this: Groups → Backup2016 → FileStorage. Note that files can only be copied in the FileStorage folder, not in any folder above it.
Important notes:
- For the fastest possible transfer, it is important that both your computer and the Protonet server are connected via cable to the same network. This usually means both devices are connected to the same router via network cable. Use a gigabit network if possible and connect to the servers IP address via SMB for best results.
- We suggest that you do not transfer large amounts of data over wifi. For mobile devices without a network port, USB- or Thunderbolt to network adapters are available cheaply. Make sure to pick a USB 3.0 adapter!
Wrong storage capacity is shown
SOUL displays 234GB instead of 256GB? 10TB instead of 12TB? Or maybe 469 GB instead of 500 GB?
Don’t panic, everything is fine!
234GB is the actually available capacity of a normal Maya with a 256GB SSD.
A small explanation:
What is colloquially referred to and displayed by Windows as gigabyte (GB) is actually a Gibibyte (GiB). This is because computer storage capacity units are based on a power of two, not a power of ten such as other units that use Kilo, Mega, Giga and so on that are defined by SI (Système international dunités). Therefore, a gigabyte is not actually 2^30 bytes but 10^9 bytes. This is why, 100 GB becomes 95,37 GiB. This means that the storage sizes declared on hard disks and blank DVDs are actually correct, but wrongly displayed by Windows.
You can use this page to convert between the units.
Requirements & recommendations
Internet connection bandwith
Upstream
- Minimum: 2 MBit/s of upstream – for low data volume
- Recommended: 5 MBit/s of upstream or higher (SDSL/VDSL)
Downstream
- Minimum: 6 MBit/s of downstream – for low data volume
- Recommended: 16 MBit/s of downstream or higher
Internet router
- Required: 1 free ethernet port
- Recommended: Automatic IP address management via DHCP server (How to set static network information on the server)
LAN
- Minimum: 100-Mbit/s connection
- Recommended: Gigabit connection
WiFi
- Minimum: WiFi adapter supporting the n-specification (802.11n)
Background
We have chosen to include specific and powerful hardware and software components as well as technologies in our Protonet servers. For example, the built-in wifi access point has a transfer speed from 150 Mbit/s to 300 Mbit/s in the 2,4-GHz spectrum. The ethernet port is designed for a gigabit connection.
But these high connection speeds can only be reached if the components used in the local area network also support these standards. Otherwise, slower components will limit the performance of your Protonet server.
For example: A slow internet connection will negatively impact the transfer speed of data already or to be stored on the Protonet server.
Does the setup process require internet access?
Yes.
During initial setup the box needs to connect to a Protonet server in order to register a protonet.info-address and receive a valid license*. If the box is unable to connect to the internet for initial setup, the setup assistant can’t be finished.
*The update mechanism and email notifications will only work if the box was successfully registered during setup and received a valid Protonet license.
ProtoSync – Technical details
Software
The new ProtoSync client is based on Syncthing (https://syncthing.net/) Version 0.11.x, an actively developed and free open source software (FOSS) that synchronizes files and folders over network. It is integrated with the free and open source software Electron (http://electron.atom.io/) that creates desktop applications based on Chromium and Node.js. ProtoSync also uses SSH (http://www.openssh.com/) on Windows in combination with Cygwin (https://www.cygwin.com/) to provide encrypted sync functionality outside of your company network. On MacOS and Linux, integrated SSH software is used. To sync from your company network without having to configure a port on your router, an SSH connection is established from the client to the server via the reverse proxy of Protonet. This is done by using the free and open software proxytunnel (https://github.com/proxytunnel/proxytunnel).
Encryption
Syncthing encrypts all data it transfers using TLS. When transferring data outside of your network, and SSH-encrypted tunnel is established over the Protonet reverse proxy trough which the TLS-encrypted data is transferred. Both encryption layers provide end-to-end encryption. The SSH connection is created using a public/private keypair. The public key is transferred from the sync client to the sever over HTTPS/TLS when it logs in. Here, the length of your password is deciding for security. If the Protonet server is not used with the Protonet reverse proxy (meaning it does not use an .protonet.info address) the necessary ports must be configured at your local router for Syncthing to work.
Sync Details
How does the ProtoSync app work?
After installing and setting up the ProtoSync app, any files or folders stored in the ProtoSync folder on your computer are synchronized to the ProtoSync folder in SOUL and vice versa. Synchronization is done some seconds, after new or changed data is detected.
ProtoSync features in short:
- Everything saved in a ProtoSync folder is mirrored on the server and all computers connected to the Protonet server with a ProtoSync app.
- ProtoSync can be used with multiple computers simultaneously.
- If a file is deleted on your computer, it will be removed from the ProtoSync folder in SOUL.
- The recycling bin or trash on whatever system a file is deleted from is used:
– If you delete a file on your computer, you find it in the recycle bin on your computer
– If you delete a file in SOUL ProtoSync folder, administrators can restore it from SOUL trash
I do not receive push notifications
Push notifications are usually send right after the last private message or an @-mention.
Premise:
The recipient is not online active in SOUL via the web browser
If this is not the issue, please check wether
- Push-notifications are activated under Settings > Notifications in SOUL
- The iOS/Android notifications on your mobile phone are activated
- There really was a trigger for a push notification that you should have received, like a private message or a group or topic message containing an @-mention in bold text.
Login to Messenger is failing?
When encountering problems, please check if:
- an update for the Messenger app is available
- the server has the current software version of SOUL installed
- the same login credentials work on the app and on the web interface (email-address (!)+ Protonet password)
- there are no typos in the server address and login credentials
- there is any umlaut in the Protonet password – our apps cannot handle these currently
- the Protonet server is not using a *.protonet.info-address:
The messenger is designed to only connect to Protonet servers with valid SSL certificates. - the mobile device is updated to a current or recent operating system
How to set static network settings on Protonet servers
By default Protonet Servers are expecting getting network information from a DHCP server.
If necessary, static network address information can be set using the command line utility netconf:

- During the setup routine, if network information are missing, the credentials necessary to access the Linux console are shown on the setup screen.
- You can access Protonet servers console by connecting screen and keyboard or via SSH. If a server is already setup, the current maintenance password is needed.
The user is “protonet”.
netconf
netconf provides two modes: The assistant and the command line mode.
The assistant is more or less self-explaining:
If you get the screen in German, please type 4 and press <Enter>. Then move on choosing the desired option by typing the according number and press <Enter> again.
netconf command line mode
netconf --help provides an overview of the flags available:
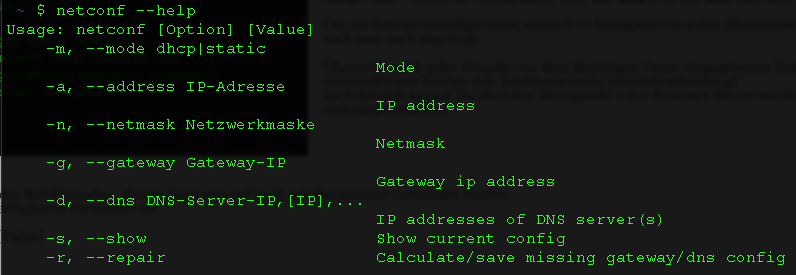
Examples:
- Show current settings:
netconf -s - Switch to dhcp mode:
netconf -m dhcp - Set static settings with two DNS servers (separated by komma):
netconf -m static -a 192.168.0.200 -n 255.255.255.0 -g 192.168.0.1 -d 192.168.0.1,192.168.0.2
Please double check any settings you made and keep the maintenance password in a safe place, in case you find network issues after the server reboot.
In case you did a mistake, simply move back to dhcp to revert to the default dhcp mode.
netconf should always be executed with the latest SOUL release. Before stable/59, the tool didn’t work properly on Carlas/Carlitas.
How can I access the Protonet solution through the local network?
The Protonet server is not only accessible over its URL (usually boxname.protonet.info) but also over local addresses that work if you are in the same local network as the server.
There are multiple ways to discover these addresses:
- Use ‘http://boxname/’ or ‘http://boxname.local’ to open SOUL in your web browser. This name does not correspond to your servers internet address but to the ‘Name of your Box’ you see on the login screen and as your servers wifi network name.
- Via Finder/Windows Explorer:
If you created a network drive that works, your servers IP-address is displayed directly in Windows Explorer or can be displayed in the Finder via ‘Get Info’. - Via the router, where your server is connected to the internet:
Log into your routers web interface and check which IP-address the routers DHCP module assigned to your Protonet server. You can use this in your browser just like a normal address: http://123.123.123.123 - Via the servers wifi, if it is active:
– The protonet.info-address always works via the boxes wifi!
– Alternatively the IP-address 10.42.0.1 (or 10.43.0.1 for the guest wifi) can be used.
Instead of http:// you can use https:// for an encrypted connection within your local network. A certificate warning will be displayed — but is no cause for concern.
Do archived groups count against the account type or just active groups?
Only active groups, not archived groups, are counted against the group limit.
We have a firewall – anything I need to know?
Out-of-the-box Protonet servers are configured in a way, that they can simply be plugged into the internet router and get all information needed (via dhcp).
If a Protonet box can not be accessed by its *.protonet.info-address or if the initial configuration fails, your company’s firewall may need to be configured to allow access to our proxy infrastructure:
Protonet servers by default must be able to reach the IP-addresses
- New: 176.9.208.209
- New: 176.9.208.211
- 13.94.194.96
- 46.253.116.250
- 46.253.116.251
- 138.201.71.59
on target ports 22666 and 443. Alternatively, the Protonet network 46.253.116.0/24 can be added.
Additionally the ports 80 and 443 need to be reachable for software updates on this address:
- New: 94.130.54.181
- 13.73.161.233
- 138.201.198.118
On very restrictive firewalls you might also need to open the following ports for outgoing connections:
- https (TCP 443) – required for sending mails, protonet.info address and receiving updates
- http (TCP 80)- required for antivirus updates
- ntp (UDP 123) – required for clock sync
- webrtc (TCP/UDP 3478) – required for video calls
- dns (UDP 53) – required for name resolution
- smtp (TCP 25) – required with own smtp server configured
For the sake of simplicity, we recommend allowing all outgoing connections of the Protonet server via ports 22666, 443 and 80.
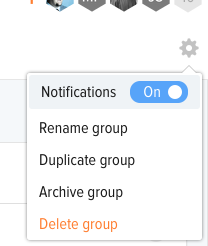
How and where can I manage groups?
Groups can be managed by all SOUL Administrators and the groups owners via the gear icon in the group.
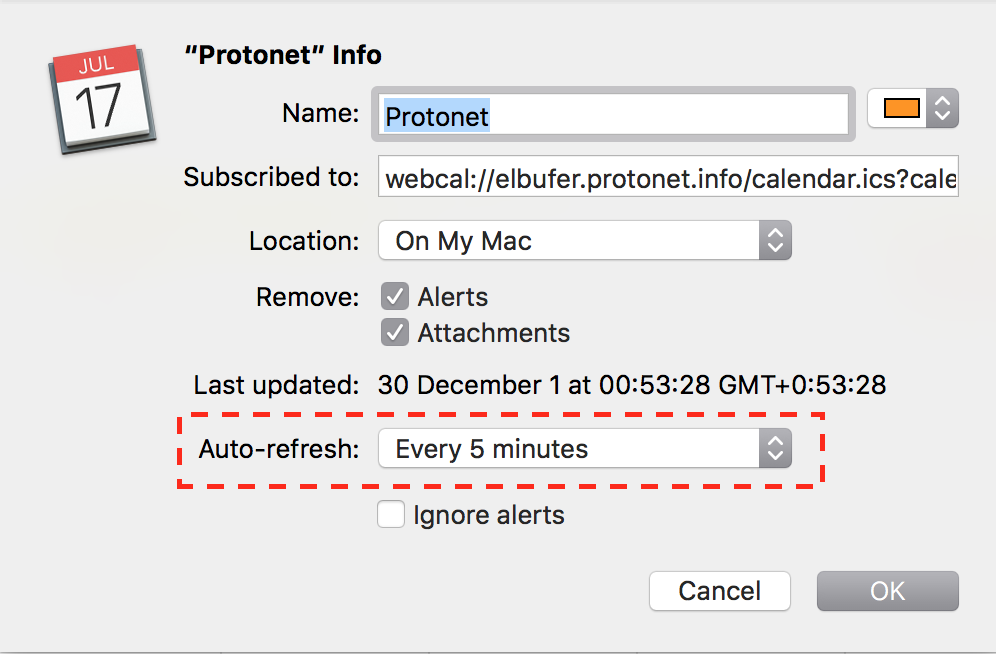
How can I integrate SOUL calendars in other calendar apps?
Group calendars and the calendar showing all public and private events of a user can be subscribed to with calendar apps supporting the webcal standard.
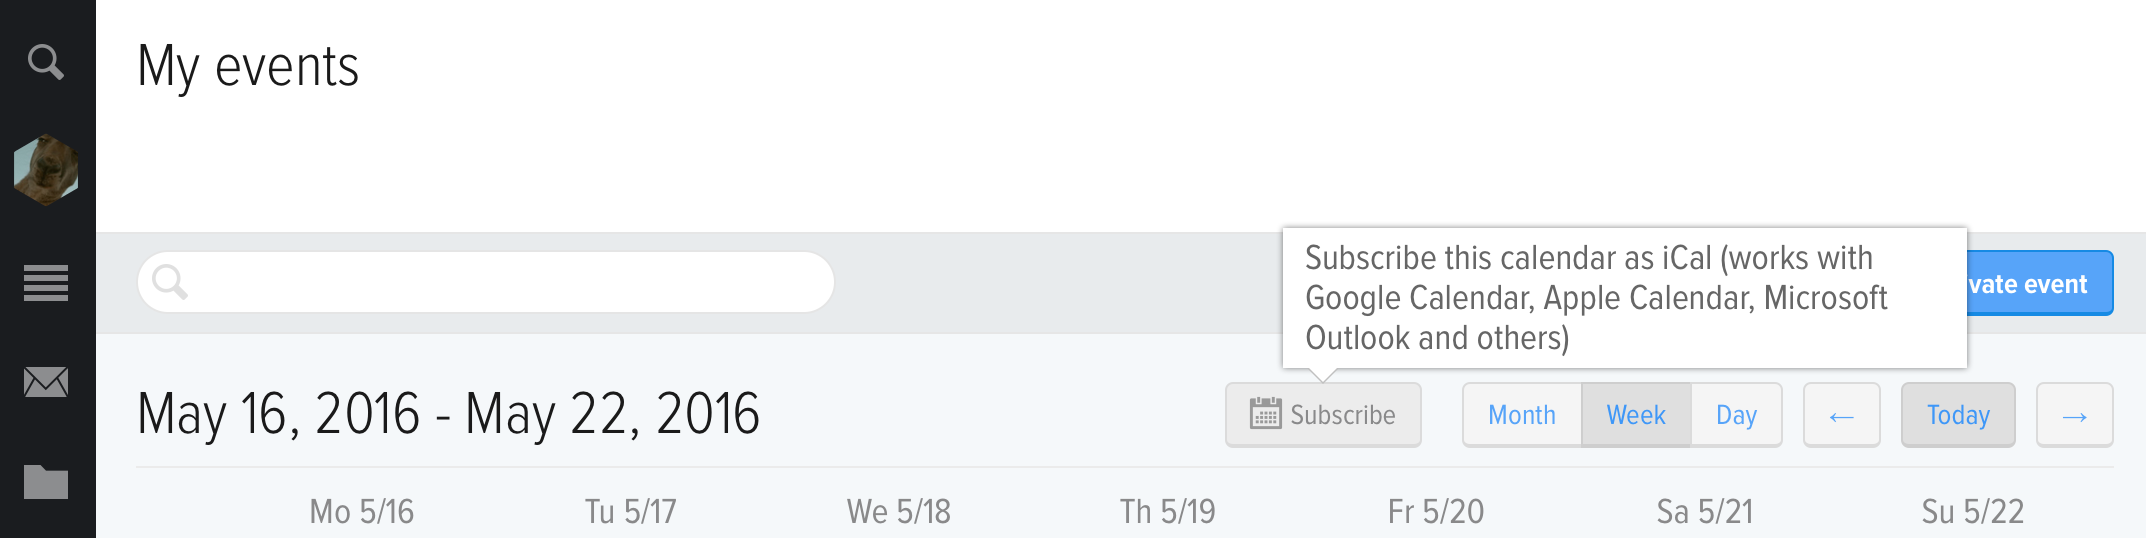
Select any calendar view and click the Subscribe button. If a compatible calendar app is installed, your browser may start it to open the webcal link:

Alternatively, a right click on Subscribe will open a context menu with an option to copy the link.
When using a custom domain name, webcal must be substituted with https!
This link can be used with different calendars such as Google Calendar, Microsoft Outlooks calendar (on Windows), Apples calendar and others supporting webcal. Some of these allow to select the refresh rate can controls how often the calendar is downloaded from your Protonet server.
Support suggestion: Default settings usually have very slow refresh rates. We suggest to adjust these i.e. to 5 minutes as seen below. The default for Apples calendar is once a week!
How can I delete users?
Open the “People” screen and navigate to the account in question. Scroll to the bottom and use the Delete button. As soon a user is deleted, he or she cannot longer access resources via SOUL or network drives.

Why does every object have a chat and what can I do within these?
Chats provide the possibility of information sharing and collaboration.
Within SOUL you can use or not use the chats right in the way you need them:
They enable you to store information such as a current status, instructions, descriptions, event planning, protocols and so on.
In this way, any information related to tasks, events, folders can be stored right with the object they refer to.
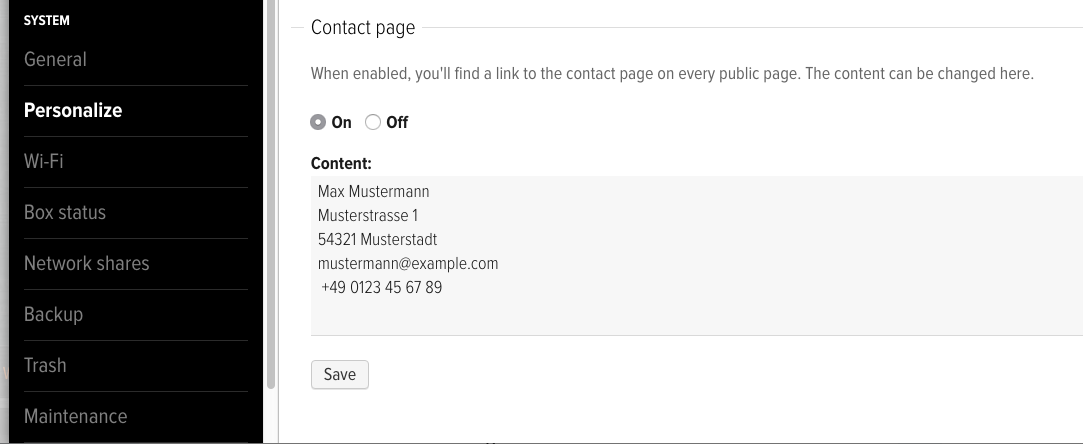
How to setup an imprint?
In the Systems section please select Personalize. At the bottom of this page, you can can enable the Contact page. When enabled, every public page will contain a link to the information you provide. Don’t forget to save.
Who is able to create and change groups, topics, events, etc.?
This is controlled by the users role and whether she or he is owner of the object:
- Any group member can create topics, tasks, etc. and manage their own objects.
- Any owner of the group that contains the object can also edit the object
Groups cannot be created by guests, which is the default role after someone has been invited.
Hints for working with files, especially on a Mac
The following steps are recommendations for working with files in MacOS Finder and are based on the experiences of the Protonet Support team and our customers.
We collected these steps to enable you to skip known pitfalls, slowdowns and problems.
- Use the Protonet box on the gigabit-port of your router.
- Have your computer connected to a network cable instead of using wifi.
- Use the latest version of your operating system and Protonet SOUL.
- In SOUL group names, folders and volumes, folders and filenames, do not use any of these characters:
a. Spaces and umlauts
b. * / : ?
c. Never start file or folder names with a . (dot)
Apple has provided more information about which characters should be avoided here. - Use Samba (smb://ip-adress/) instead of AFP – Note: Using both SMB and AFP is not recommended, especially in mix-environments (Mac + Windows).
- Download Office documents onto your Mac, edit them locally and then upload them. Office does not always clean up its so called ‘lock-files’ which may cause problems. Also storing Office files via internet connections can fail, especially if connections are slow.
- Do you use Adobe software? Check for each product wether working on network drives is officially supported by Adobe. Adobe themselves are discouraging from working on network drives for these good reasons.
- Deactivate previews/thumbnails in Finder or choose a different view. Also deactivate filesize calculation in Finder (German instructions).
- Moving folders and lots of files within the server is faster via WebDav protocol.
- Exclude network drives from virus scans, if you have any antivirus software running locally.
- iPhoto/iTunes/… libraries are only to be saved locally on your mac, according to Apple.
- For transferring private files, use the ProtoSync feature
Box status – how to spot potential problems in SOUL
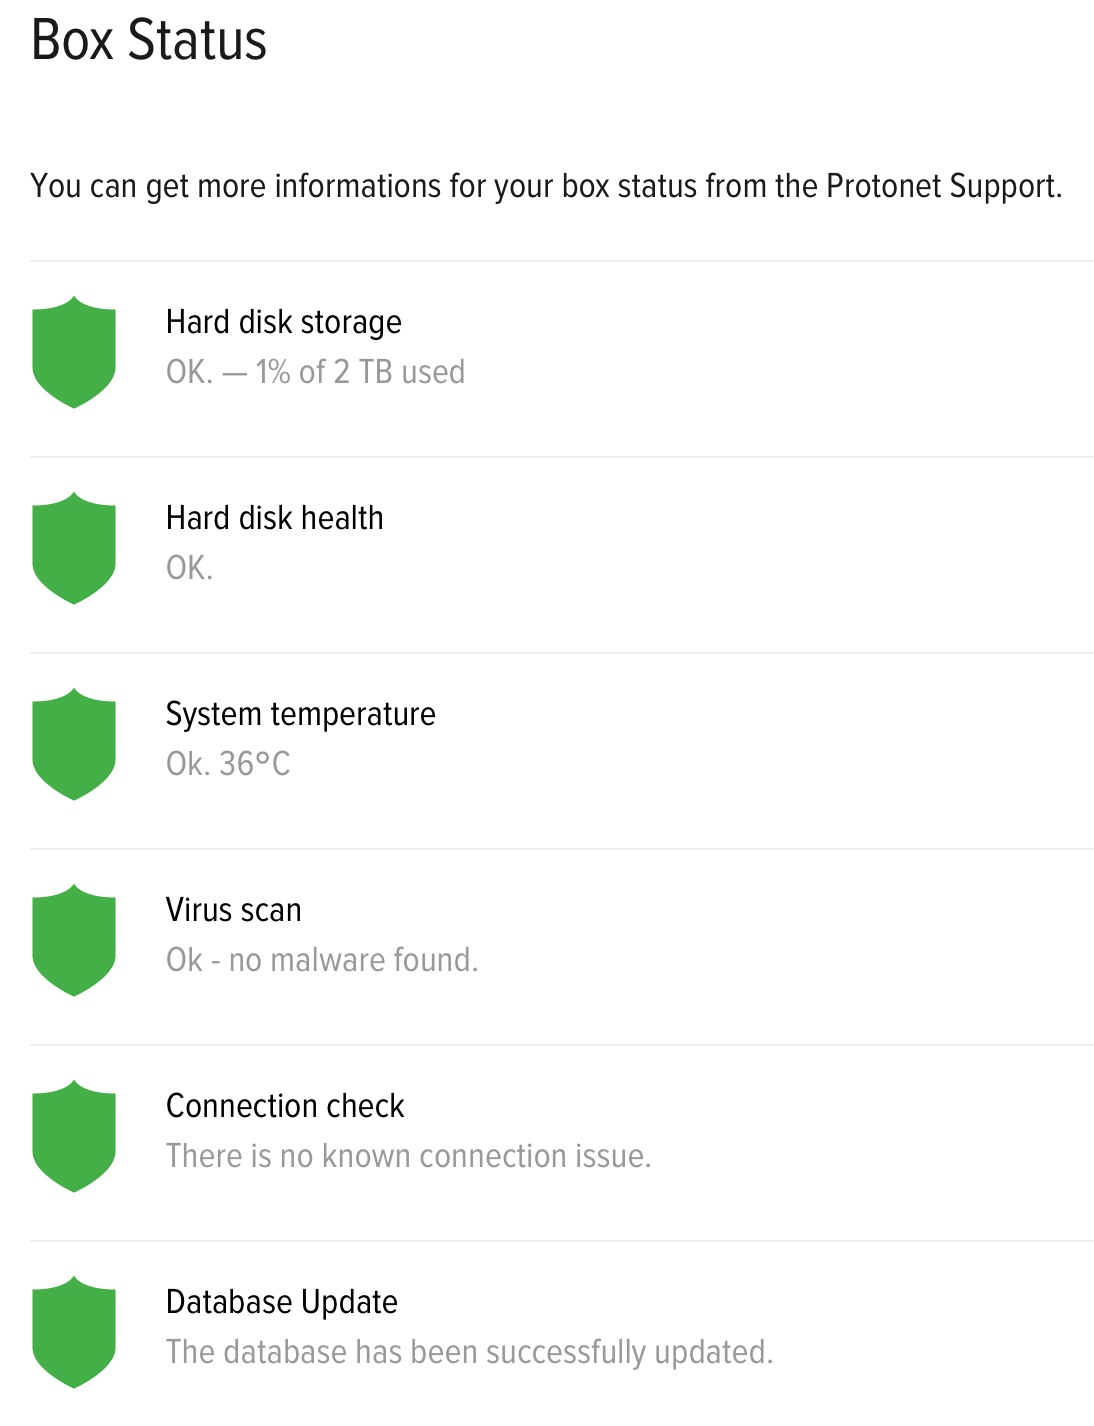
SOUL administrators can use the Box status page in System settings at any time to check for possible issues the Protonet server or network might have.
Hard disk storage
Shows used and total storage capacity.
Possible status messages:
- Green: up to 75% used
- Yellow: Over 75% used
- Red: Over 98% used
Recommended action for red status
Immediately remove files that are no longer needed or temporarily move files off the box. With a 12TB Carla, 98% are not critical. A Maya with 250GB capacity requires immediate action if 90-95% of its capacity are reached. Here is a short overview:
– Maya 250GB – 98% = 5GB free
– Maya 1TB – 98% = 20GB free
– Carla 12TB – 98% = 240GB free
Hard disk health
This section shows the status of the internal hard disc drives.
Possible status messages:
- Green: All drives are in normal condition.
- Red: At least one drive is not accessible.
Recommended action
Ensure that a recent backup is available and contact Protonet support for further analysis. You should not ignore this warning! There is a risk of data loss should another drive fail.
System temperature
Shows the current system temperature.
Possible status messages:
- Green: up to 80° C
- Yellow: up to 105°C
Recommended action:
Contact support, should the temperature not fall within 12 hours. - Red: beginning with 105°C
Recommended action:
Contact support for further analysis.
Virus scan
Shows the results of the last virus scan.
The virus scanner performs a check of all files once a week. It looks for new virus identification information every hour. If a virus is found, there is no threat for the Protonet server itself because it can not be executed on the server. The virus scanner only identifies potentially infected files that were uploaded to the server by users. It is no replacement for virus protection software on all other devices used to work with the server but is intended as an additional warning measure.
Recommended action
Research information on the malware found and remove the infected files if necessary.
Connection check
Shows whether there are any problems with the boxes connection and availability.
Included tests:
- Whether a network cable plugged in
- Whether the network or internet connection is interrupted
(by pinging an external IP address) - Whether there are problems with the nameserver (DNS)
(by resolving an external domain name)
Recommended action
Check the individual problem displayed. Administrators or internet service providers might be able to help: For example there might be an issue with the ICMP-protocol being blocked by the firewall. A reboot of your router followed by a reboot of your Protonet server might also help.
What happens in case of a hard disc failure?
A hard disc drive (HDD) failure is indicated to SOUL administrators in the navigation bar on the left and the Box status section of the System settings.
The section Hard disk health shows the status of the internal hard disc drives.
Possible states:
- Green: All drives are in normal condition.
- Red: At least one drive is not accessible.
Recommended action for a red status: Ensure that a recent backup is available and contact Protonet support for further analysis. You should not ignore this warning! There is a risk of data loss should another drive fail.
How is communication with Protonet servers protected?
The use of Protonet server can be done via LAN cable, Wi-Fi or via the Internet browser.
When using the Protonet server via WiFi we guarantee security through a WPA2 encryption.
When reaching the server over the internet the transmission of data occurs via 2048-bit SSL encryption, which is the standard for online banking.
How is data loss prevented?
RAID 5 is a group of drives where every drive keeps it’s own data and a bit of parity data. This way, if one drive in the group fails, its data can be reconstructed from other drives.
Can I install additional software or services on the Protonet server?
To ensure the stability of the Protonet software and protecty your data, we have decided to run SOUL on an persistent operating system. However, in individual cases there may still be technical reasons to set up additional configuration or services on the Protonet Server.
In general we advice to install additional software and services on the Protonet server within virtual machines.
Small customizations can be realized with so called local_patches.
Modifications of the Protonet server always happen at your own risk and not covered by standard support!
In case of any issues after modifications have been applied by adding custom configuration or shell scripts, any changes need to be removed to test whether they cause or trigger the problem. To do so it might be necessary to connect a HDMI display and a USB keyboard to the Protonet server.
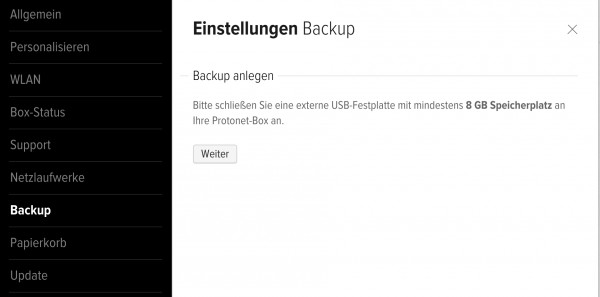
How do I create a backup of my Protonet server?
In SOUL you can start a backup to a memory stick or USB hard drive from System Settings under Backup. The page tells you how much free space your backup media needs to have at minimum.
Note: Besides the Protonet backup, no other data can be stored on the backup medium – anything else will be erased!
How are Protonet servers by default accessible via the internet?
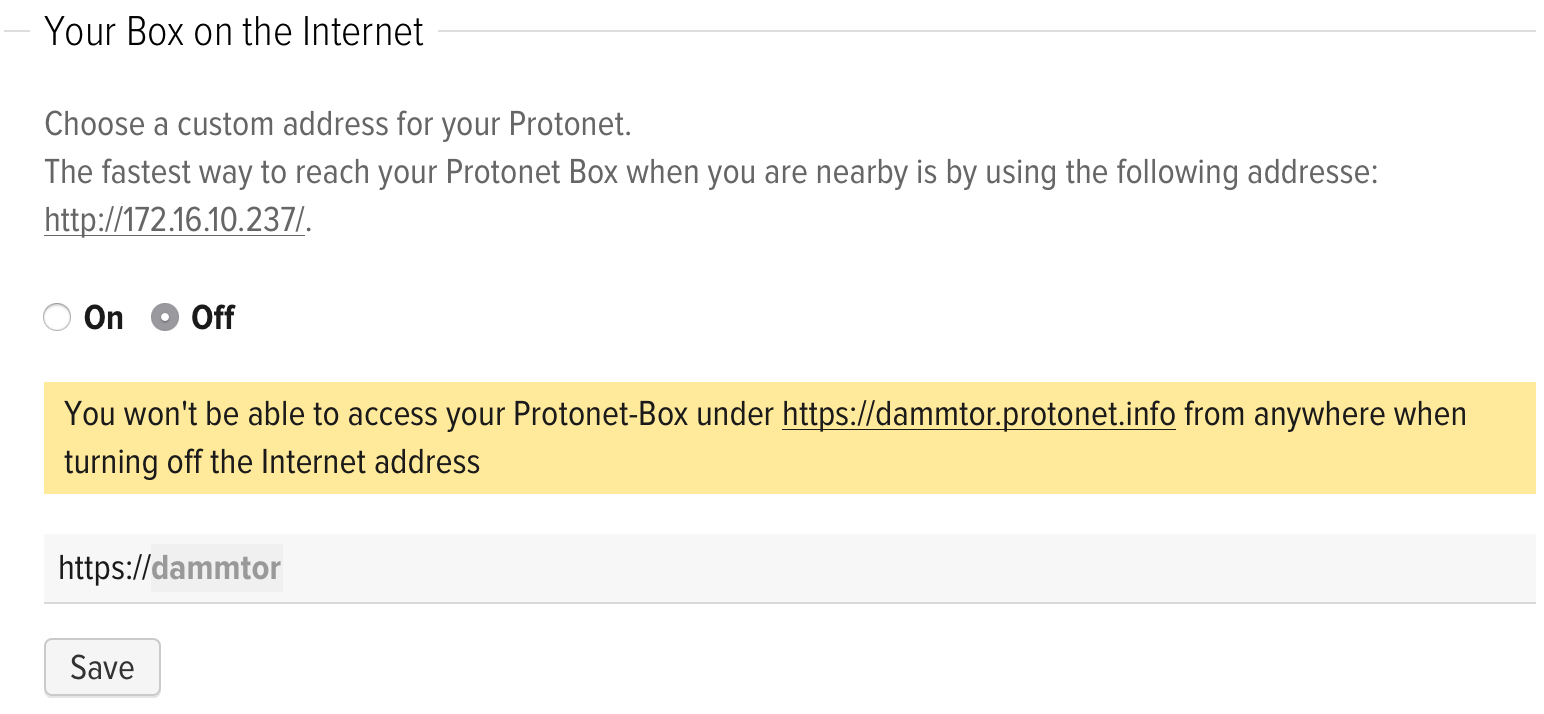
By default our servers are accessible via a proxy service. As soon as an internet connection is available the server connects to the proxy service, unless you disabled this in the ‘Your Box on the Internet’ section. The proxy service makes the box accessible via the chosen servername.protonet.info address.
Any traffic between your server and the proxy service is encrypted with a Protonet certificate.
It is also possible to use your own domain or a DynDNS domain (German instructions can be found here). Please ask Support in case you need assistance.
Regarding why we do it this way, there is a German blog post available here.
List of port numbers in use
This list of ports is irrelevant for most of our customers.
When shipped, the Protonet boxes are configured to just work with all the usual internet connections and receive all necessary network information automatically via DHCP.
Outgoing connections:
ssh (TCP 22666) for the protonet.info-address,
https (TCP 443) for mail dispatch,
http (TCP 80) for updates,
ntp (UDP 123) for time syncronisation,
webrtc (TCP/UDP 3478) for video calls,
dns (UDP 53) for name resolution,
smtp (TCP 25) for custom mail addresses and future mail dispatch.
Incoming when using your own domain:
https (TCP 443) for access to Soul.
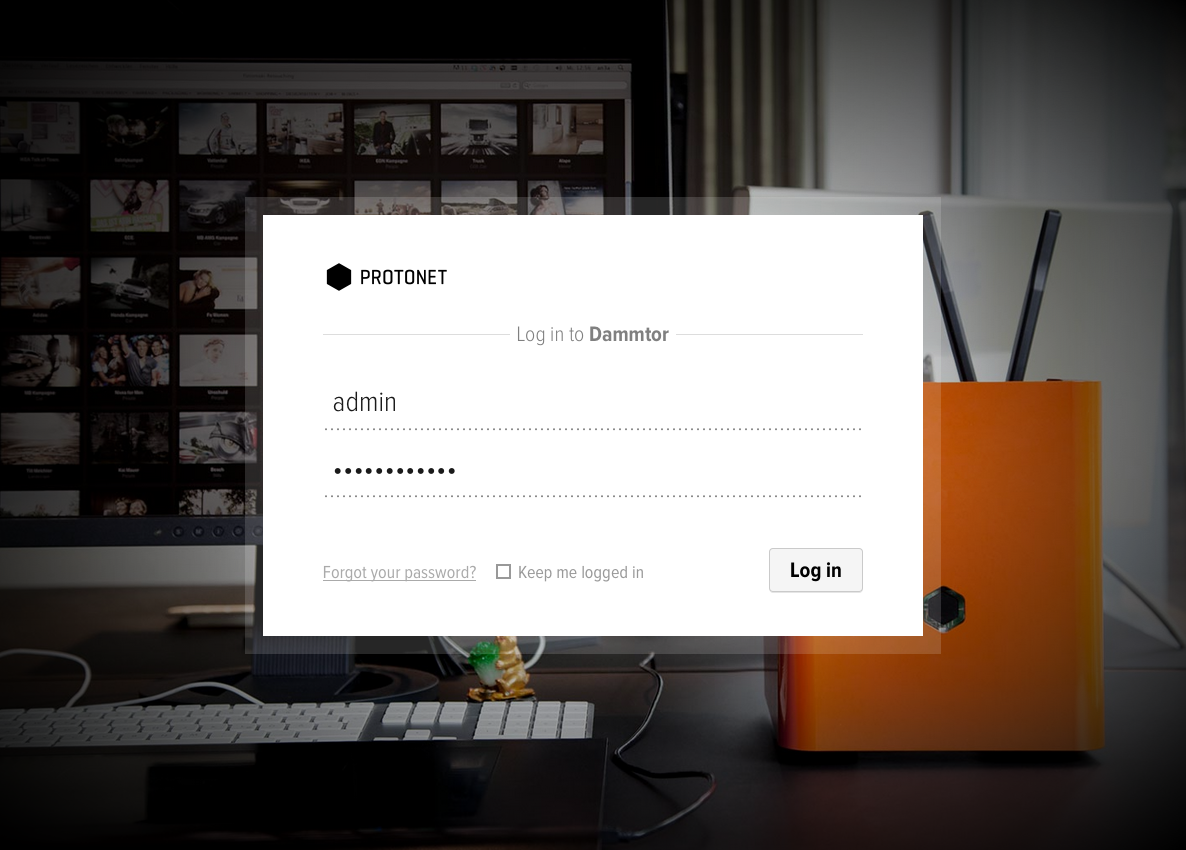
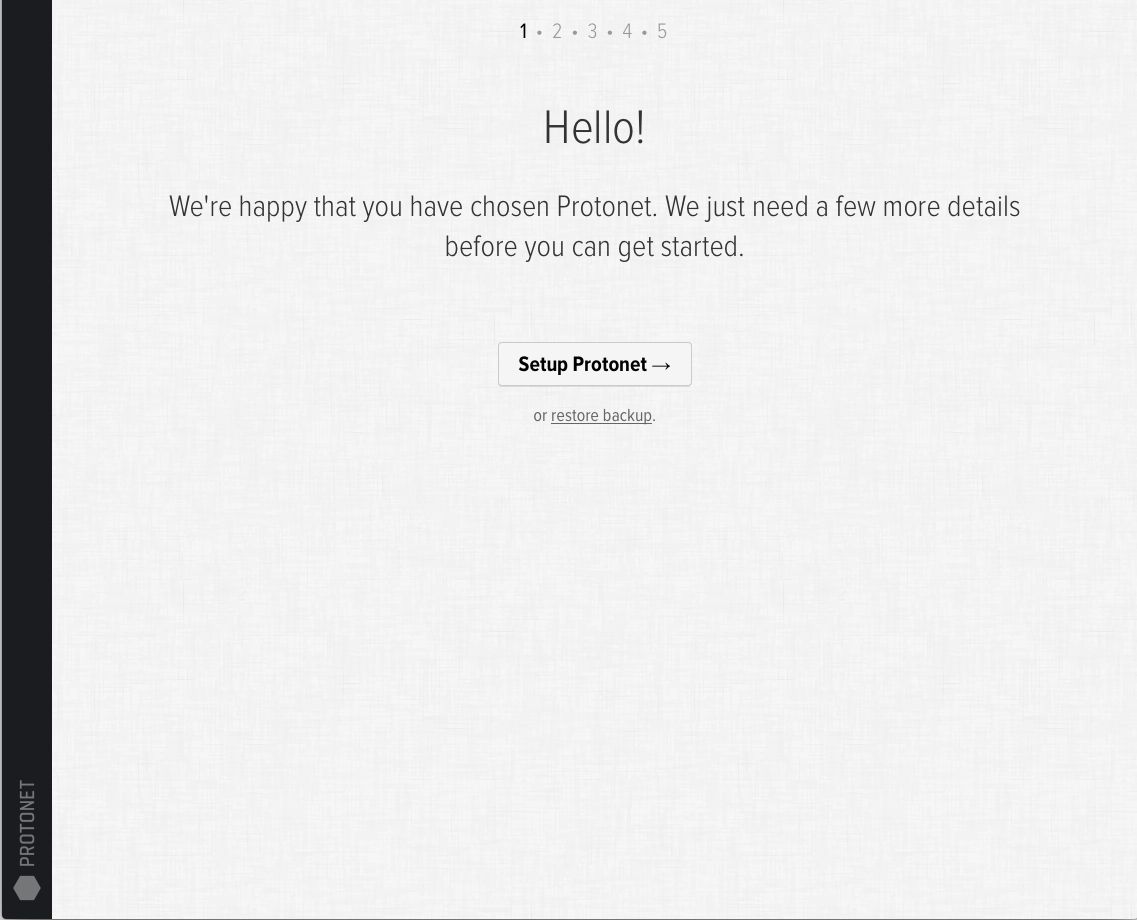
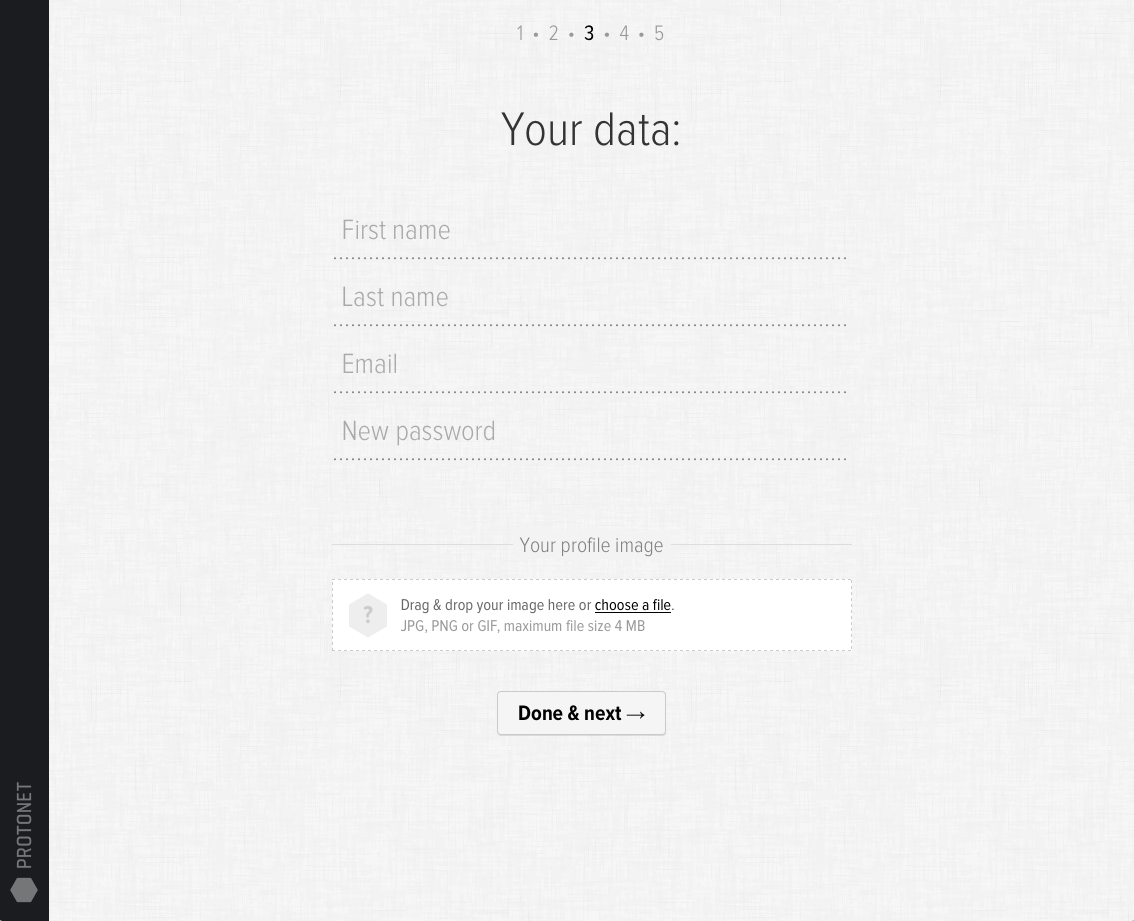
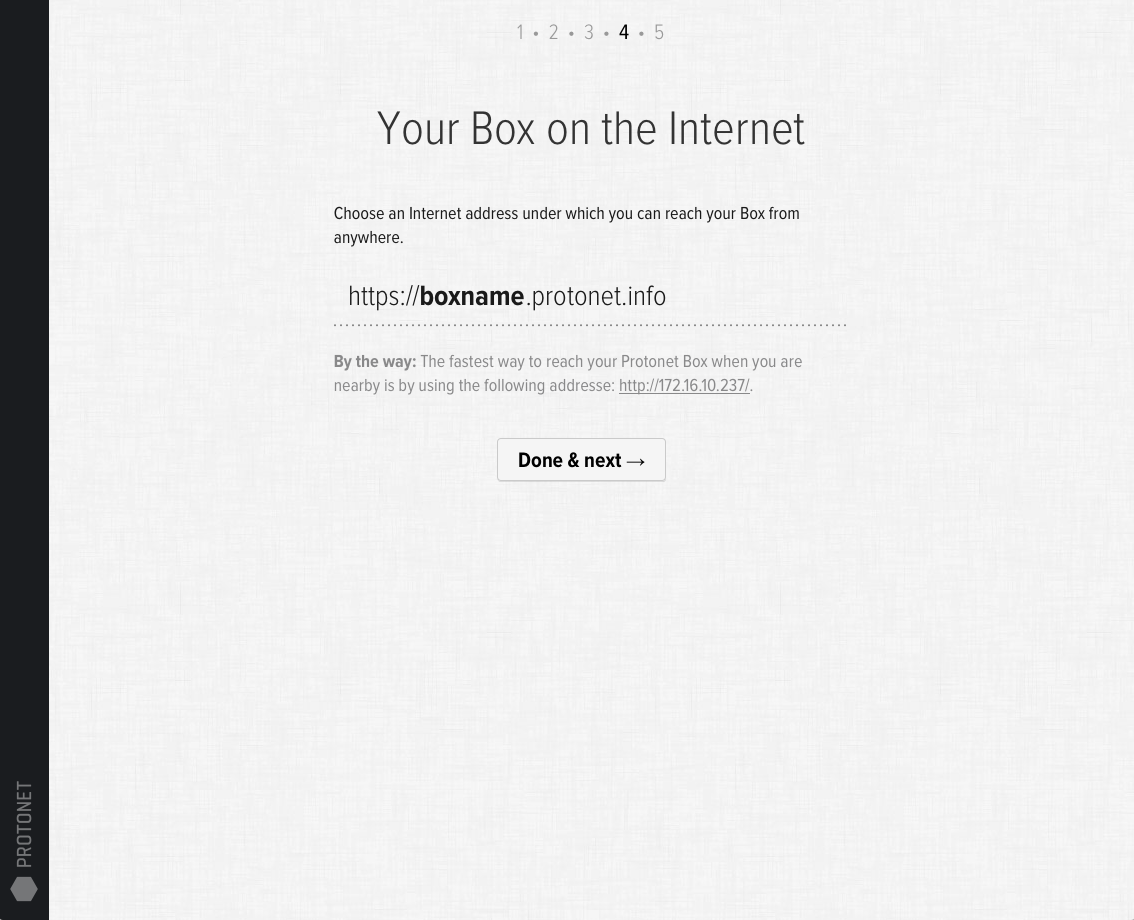
How do I set up my Protonet server?
Protonet Servers are sold with user instructions that cover the setup and initial steps.
The instructions cover the following:
1. Login
2. Restore from Backup or setup Protonet?
3. Successful network tests are required to proceed

4. Setup user credentials are overwritten with personal data
The setup user ‘admin’ is no longer existent after this step. Please remember your name, email address and password!
5. Choose internet address for the box / automatic licensing
If this step fails, please check whether your firewall requires configuration.
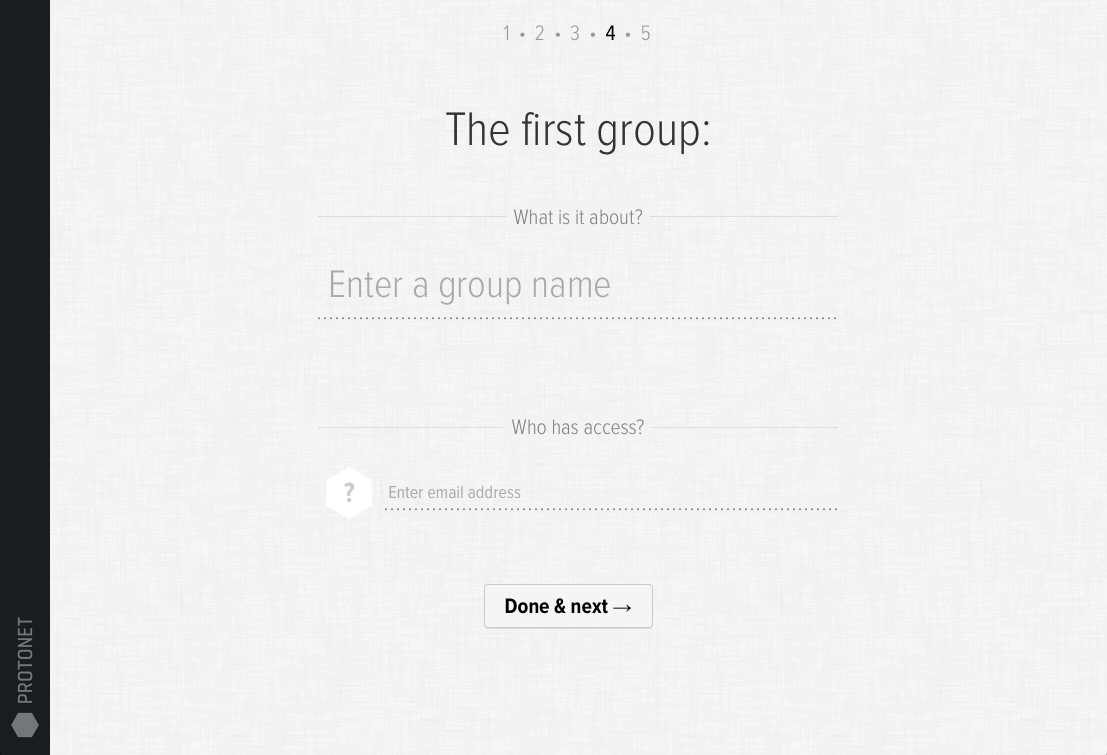
6. Name the first group, invite people and you’re done!
Can I switch off internet availability?
As a SOUL administrator the internet access can be switched off in the System settings.
Why am I sometimes unable to reach the Protonet solution?
When the availability of the server is interrupted repeatedly or the connection is very slow, the root cause often is a slow or unstable internet connection. This is usually the case if the upload speed is below 1 MBit/s either permanently or temporarily e.g. due to a high volume of data transfers such as downloads.
This can be easily diagnosed on our own by doing a speedtest:
If your computer uses the same internet connection as the Protonet server, you can simply use speedtest.net in your browser. Alternatively you can hook up your computer to the same network port that your Protonet server is usually connected to and run the test.
Sometimes too many devices are connected to the same switch and have to share its bandwidth!
Users with Linux know-how can run a test directly on the server. After logging onto the console, simply execute the command ‘speedtest’. (This forum thread explains the ssh login.)
For a seamless experience we recommend following specs:
Minimum requirement: 2 MBit/s upstream (for small data transfer volumes)
Recommended: 5 MBit/s upstream or more (SDSL/VDSL/Cable)
Minimum requirement: 6 MBit/s downstream (for small data transfer volumes)
Recommended: 16 MBit/s downstream or more
We also recommend talking to your internet service provider if the speedtest results are below the values expected. Protonet unfortunately is unable to assist in this issue.
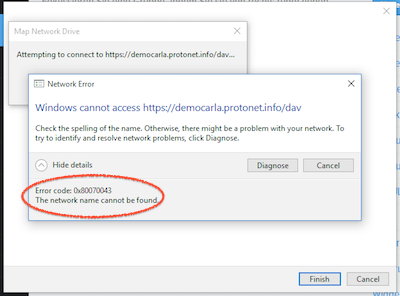
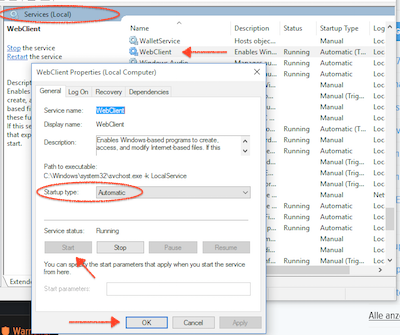
Windows cannot access https://box.protonet.info/dav
When attempting to create a network volume in Windows Explorer using the WebDAV protocol, the following error message appears:
Windows cannot access https://box.protonet.info/dav
This message indicates that the necessary service for WebDAV connections has not been started yet. This can be corrected as follows:
- To get to the services overview, press the Windows key and type ‘services’ and open the Services settings tool
- Select WebClient from the list of services
- Start the WebClient service
- Ideally, set the Startup type to Automatic, so the service starts again at every restart of your computer
Command line/SSH access to the Protonet server
It is possible to access the command line directly via ssh or by connecting a display and keyboard directly to the Protonet server.
The user name is protonet and the password is the current maintenance password.
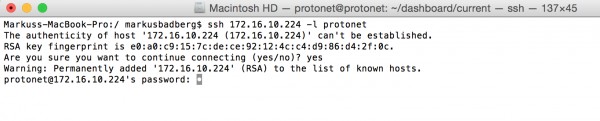
MacOS or Linux – using ssh in a terminal
- With the internal IP of your server (find it on the Help page in SOUL or your routers device table) and the user protonet you can login to your server:
ssh protonet@[your servers IP]Note: Accessing your server over SSH via your Protonet internet address (boxname.protonet.info) from outside your network is documented in this article. - Enter your maintenance password into the password prompt and confirm by pressing enter. The password is not displayed while you enter it!
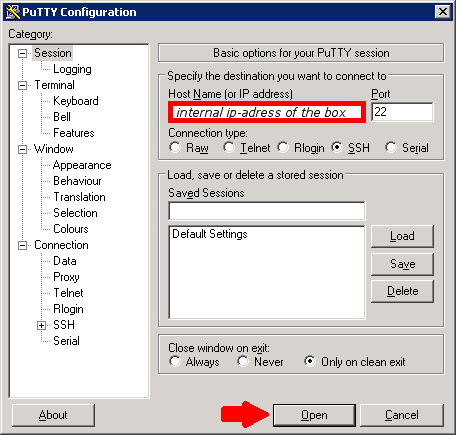
Windows – using an SSH client like Putty
- Start the client and enter the IP address of your Protonet server in the corresponding field
- Press Open.
- Confirm the prompt wether to trust the server with ‘yes’.
=>A new windows opens displaying ‘Login as:‘. - Enter the user name
protonetand confirm with enter. - In the password prompt, enter your maintenance password and confirm with enter. The password is not displayed while you ebter it!
Note: You can not paste with CTRL+V in Putty but it works with a right click.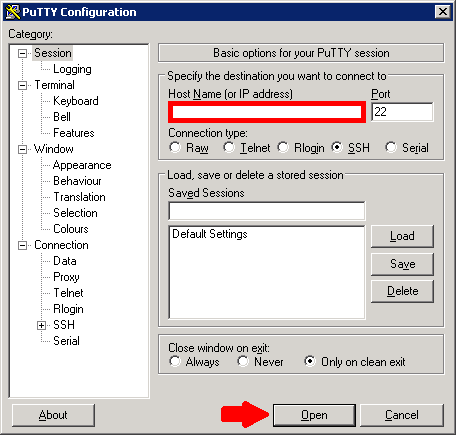
How to reset Protonet Servers?
To avoid the Protonet solution – including any data – is being reset by mistake, there is a command line utility available, which requires ssh access and the current maintenance password.
To generate the maintenance password in the SOUL web interface as a SOUL administrator you navigate to „System Settings“ -> „Support“. Here you click the „Create new maintenance password“ button.
1. On Windows
Please download and use putty.exe.
When you are asked for credentials, use protonet as username and the maintenance password generated.
1. On MacOS or Linux
Open a terminal on your mac and type „ssh *ip.of.your.box* -l protonet“
For example: ssh 192.168.1.21 -l protonet
You should now see something like this:
Here you need to type in the maintenance password.
2. On Both
Right after login start the reset process by typing:
sudo su –
self_destruction
reboot
Everything will be deleted now.
If afterwards you still see only the system settings untouched, this is correct for older Protonet Boxes (before autumn 2014).
How to switch off or restart the Protonet server?
After a short (!) push of the hexagonal button on the front of the Carla/Carlita or the top of the Maya the server will shut down. Once the lights in the button are off, the server is shutdown completely.
To restart the server, push the button again. This may take up to 15 minutes. Right before the Protonet solutions is up and running again, the button will show a black-and-white rotation animation. About 1-2 minutes after, the Protonet server should be ready and reachable.
Alternatively, you can use sudo shutdown -h now and reboot via the Linux shell.
Note: Once the server is shut down, it cannot be started remotely!
Should the server not be reachable after a restart, it might be for these reasons:
- Every 30 starts, the server is running a file system check to ensure data integrity. This may delay the server start for up to 45 minutes. To check if this is the case, you can connect a display to your server. A forced restart will not skip this procedure.
- There may still be an external USB memory stick or drive connected to the server. Please remove it and restart the server.
How do I create user accounts?
You add users by inviting them to a group or – if already registered within the Protonet solution – add them directly.
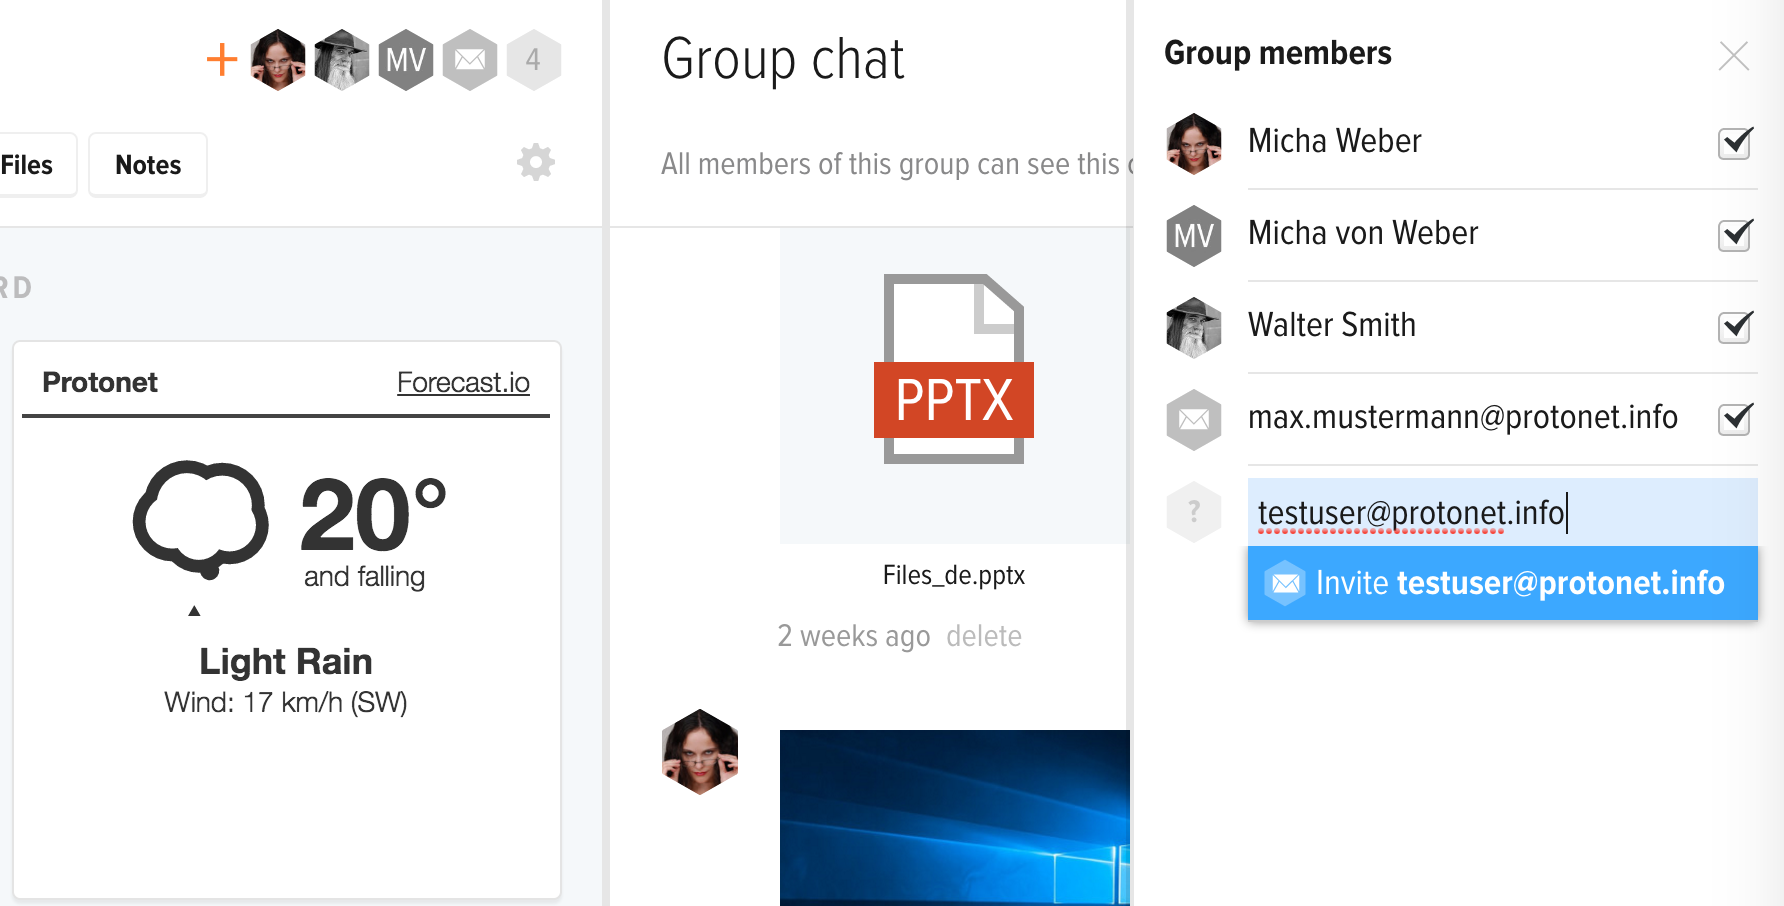
There is no dedicated user account management where users are created. Administrators and users with role “user” are able to see any registered persons on the “People” tab.
Can I reach Protonet SOUL through any web browser
Protonet SOUL is a web application, which is constantly being maintained and optimized using the latest web technologies and standards. Therefore, the use of a current Internet browser is essential to use all the features of Protonet SOUL.
In case you are experiencing any issues, please check if your web browser is up to date or if there is any plug-in oder personal firewall blocking any browser features.
Please note the following limitation:
Video calls require Chrome, Firefox or Opera since other browsers do not yet support the necessary technology (WebRTC).
How to create virtual machines on Carla?
For implementing a VM with the KVM / qemu technology the following steps are necessary:
1.) Create a disk image containing the VM:
cd /protonet/data/var/lib/libvirt/
sudo mkdir images
cd images/
qemu-img create -f qcow2 disk-image-vm.qcow2 2T
qcow2 = format of the image that allows for snapshots to be saved
2T = size of the disk image, in this case 2 terabytes
2.) Upload the installation media, i.e. CentOS as an ISO image:
scp CentOS-7.0-1406-x86_64-DVD.iso protonet@<HOSTNAME>:/protonet/data/var/lib/libvirt/images/
=> Enter your maintenance password
3.) Installation of the operating system within the VM:
virt-install –connect=qemu:///system –name=linux-server –ram=4096 –vcpus=4 –disk path=/protonet/data/var/lib/libvirt/images/disk-image-vm.qcow2 –vnc –os-type=linux –network=bridge:br0 –disk /protonet/data/var/lib/libvirt/images/CentOS-7.0-1406-x86_64-DVD.iso,device=cdrom
–ram = memory (RAM) size in megabytes
–vcpus = number of processor cores
–network = set up as a bridge interface so the the VM is in the same network as the Protonet server
4.) Access to the VM:
ssh protonet@<HOSTNAME> -L 5900:localhost:5900
Use a VNC viewer to connect to localhost:0
5.) KVM management:
the KVM shell “virsh” provides all options via command line, i.e.:
virsh list –all => displays all VMs (running and stopped)
virsh start <VM name>
virsh shutdown <VM name>
virsh destroy <VM name>, if shutdown fails
Source: http://blog.onlinehelp24.net/post/97054196815/vm-auf-protonet-einrichten
Additional information from our support:
- When planning virtual machines, please remember that Protonet SOUL requires a minimum of 8 GB memory (RAM).
- If the following error occurs while installing a VM:
"Installation konnte nicht fertiggestellt werden: [...] could not open disk image /var/lib/libvirt/images/disk-image-vm-qcow2: Permission denied"
permissions must be corrected for the folder/var/lib/libvirt/images/like this:
chown -R libvirt-qemu:kvm /var/lib/libvirt/images/
Please note: Make sure SOUL still has a minimum of 8GB of RAM available.
Support might be limited if you modify the hardware or software and this leads to problems. Any modifications are at your own risk!
Can a Protonet server be connected to our network via wifi?
This is not possible. The Protonet servers wifi module is intended to provide wifi access, for instance as an alternative to a router or access point.
A free network port at a switch or a router is necessary to connect the Protonet server to a network.